6
Making a Cable Association
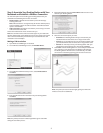
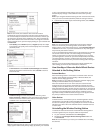
1 Open wireless USB manager on notebook.
2 On the Wireless USB Manager screen, click Add New Device.
3 On the Wireless USB Device Setup screen, select Cable Association.
Click Next.
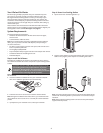
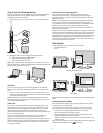
4 Attach the USB 2.0 cable to the mini-USB connector on your Docking
Station.
Attach the other end of the cable to a USB port on your notebook. The
software automatically begins the association process.
Note: The power/connection indicator light flashes green and amber
during the association process.
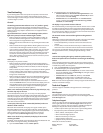
5 (Optional) If desired, select the Device Name field and enter a new
name for your Docking Station.
6 Select the connection option you want:
• Automatic: Your Docking Station always connects with your
notebook when the two devices are in range of each other.
• Prompt: You are prompted to connect your Docking Station with
your notebook when the two devices are in range of each other.
• Manual: You manually connect your Docking Station with your
notebook by right-clicking the icon and selecting Connect.
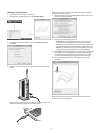
7 Click Finish. Once the Docking Station is successfully associated with
your computer an icon will appear in the Wireless USB manager.
The Docking Station will then connect automatically. The active
connection is indicated by opposing green arrows over the icon.
8 Disconnect the USB cable from your Docking Station and your
notebook.
Note: The power/connection indicator light glows green when the
wireless connection is established.