


33
The snooze duration for listed alarms can also be programmed up to 15 minutes.
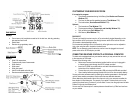
ACCESSING TIME WINDOW
Press UP or DOWN until the TIME icon will flash.
PROGRAMMING YOUR LOCATION
IMPORTANT:
There are two options available for programming a location – an auto and
manual.
In case of an auto programming, select the closest city code from the codes list
programmed in the unit, then all necessary location data (longitude, latitude, time zone
and daylight savings time adjustment) will be set automatically.
In case of the manual programming, select the code USR (user) from the city codes list,
then you would need to enter all location data (longitude, latitude, time zone and daylight
savings time adjustment) manually.
AUTO-PROGRAMMING
• In the Time Window, press and hold SET button until the day of week
language abbreviation “ENG” will flash
• Press the UP or DOWN selecting the day of the week in English, German,
French, Italian, Spanish or Dutch
• Press SET to confirm selection
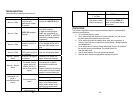
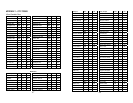
• Select the city code closest to your area by pressing UP or DOWN. Refer to P.
for a list of available codes
• Press SET to confirm the selection and enter to the year, calendar and
time
setting
mode
• Press the UP or DOWN selecting the current year, date, month, time format,
hour and minutes
• Press SET every time to confirm each selection and move to the next
MANUAL PROGRAMMING
• In the Time Window, press and hold SET button until the day of week
language abbreviation “ENG” will flash
• Press the UP or DOWN selecting the day of the week in English, German,
French, Italian, Spanish or Dutch
• Press SET to confirm selection
• Select the code USR by pressing UP or DOWN
• Press SET to confirm selection and enter to the latitude and longitude setting
mode (the degrees of latitude will flash)
• Press UP or DOWN to adjust the latitude (degrees, minutes and direction).
34
Press and hold either button for quick digits advance
• Press SET to confirm selection
• Continue setting the longitude (degrees, minutes and direction) using the same
technique
• Press SET to confirm the selection – 0:00 + tz will flash prompting to enter the
Time Zone setting mode (the Time Zone data is provided on P.)
• Set the Time Zone by pressing UP or DOWN to adjust the time in 30 min
intervals. Press and hold either button for quick digits advance
• Press SET to confirm selection – the DST no will flash prompting to set the
Daylight Savings Time option
• Press UP to enable and DOWN to disable the DST option
• Press SET to confirm selection and the year digits will flash
• Continue setting the year, month, day, calendar format (day/month or
month/day), time format (12 or 24 hours), local hour and minutes, using the
same technique
After programming is complete the display will return to the default Time Window.
Note: Press and hold SET anytime during the setup to return to the default Time
Window and all previous settings will be cancelled
.
DIFFERENT CLOCK AND CALENDAR MODES
In the Time Window press SET selecting either:
• Hour and Minutes with the Day of the week
• Hour and Minutes with the City code
• Hour and Minutes with the Seconds
• Month with the day and a year
• Hour and Minutes for UTC (Coordinated Universal Time)
ACTIVATING OR DEACTIVATING ALARMS
• Press the ALARM/CHART to display the Weekday Alarm (W), Single Alarm (S)
or Ice Warning Alarm (Pre-Al) time. If these alarms are not set, the
abbreviation OFF will be displayed
• To enable or disable any of these alarms, press UP or DOWN
Note: Press SET anytime during alarm selection mode to return to the default clock
display.
PROGRAMMING ALARMS
• In the Time Window, press the ALARM/CHART selecting the desired alarm-
W, S or PRE-AL
• Press and hold ALARM/CHART button until the hour digit will flash