


10 11
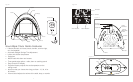
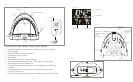
Remote Sensor Battery Installation:
1. Loosenthe4screwssecuringthebatterycoverwithasmallscrewdriver
(included)andremove.Insert2alkalineAAAbatteriesaccordingtothepolarity
direction indicated.
2. Placethehomereceiver(SoundSpaPremier)ascloseaspossibletotheremote
sensor.Thiswillhelpwithsynchronizationbetweenthetwounits.
NOTE: Once you are ready to position your remote sensor and home
receiver, ensure that the distance is not outside the effective transmission
range (100 feet). Some building materials and location of the home receiver
or remote sensor can affect transmission quality and range. Try various
locations for best results.
3. PresstheC/Fbuttoninsidetheremotesensortochangebetween
º
C and
º
F.
(Theremotesensorispreseton
º
F.)
4. PresstheTXbuttoninsideoftheremotesensortoverifythereception.
5. Replacethecoverandtightenthe4screws.
NOTE: It is recommended to test the units next to each other to ensure that
both the remote sensor and home receiver are properly synchronized.
Remote Sensor Mounting Instructions
The Remote Sensor comes with a table stand or can be wall mounted.
Table Stand -
Simply fold out the attached stand from the mounting bracket.
Wall Mounting -
Set a screw in the desired hanging location and mount. A screw and wall anchor
have been included for your convenience.
NOTE: Keep the remote sensor out of direct sunlight and rain.
Do not mount on metal surface.
Remote Sensor Low Battery Indication
Lowbatteryindicationisavailableforthemainunitandtheremotesensor.
A battery life “ ” icon will display on both. Replace the batteries as necessary
and follow the setup procedure.
MAINTENANCE AND CARE INSTRUCTIONS
• Extremetemperatures,shockorareasofunusualvibrationshouldbeavoided
to prevent damage to the units.
• Cleantheunitsusingonlyasoft,dampclothtowipe.Donotusesolvents,
abrasives, detergents or other strong cleaning agents. After cleaning, wipe
surfaces with a dry cloth.
• Donotsubmergeunitsinwaterorotherliquids.
• Donotsubjecttheunitstoextremelyseveretemperatures-DONOTPLACE
UNITS INTO OVENS, FREEZERS or MICROWAVE UNITS.
NOTE: Opening the housing (other than the battery compartment) of the
Remote Sensor or the SoundSpa Unit will invalidate your warranty. Do not
attempt to repair this unit - There are no consumer serviceable parts.
TROUBLE SHOOTING
Indoor and Outdoor temperatures do not match when placed next to
each other -
Thesensorismanufacturedtobe+/-2degreeinaccuracyundernormal
conditions. So it is possible to have up to four degrees difference shown on
theseparatetemperaturesensors(onecouldbe“+2degree”andtheother
“-2 degree”. Additionally, the calibration curve is different between the two
units because of the greater temperature range of the outdoor sensor. Errors
are usually noted on the extreme ends of the temperature ranges.
SoundSpa unit is not accepting remote transmissions -
Theunitsmaynotbeproperlysynchronizedorthebatteriesmayneedto
be replaced. See “USING OUTDOOR TEMPERATURE” section for detailed
instructions.Withthetwounitsnexttoeachother,attemptsynchronization.
Remember to always place the remote sensor within the effective transmission
range and away from large metal surfaces.