


Note: A PM indicator will appear in the upper left hand corner of the LCD
display during the PM hours. Be sure to set the time for the correct 12-hour
period - AM (morning) or PM (evening).
Listening to Nature Sounds
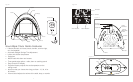
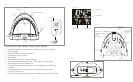
1. Selectthesoundyouwishtolistentoandpressthecorrespondingbutton(Fig.
1).
2. Toadjustthevolume,turntheVOLUMEknob(Fig.1)toyourdesiredlevel.
3. Whenfinishedlisteningtothesoundsyoumayturnthemoffbypressingthe
POWERbutton,orswitchtotheradiobypressingRADIO(Fig.1).
Note: When the unit is turned on it will always default to the last mode used.
Listening to the Radio
1. PresstheRADIObutton(Fig.1).
2. PresstheRADIObuttontochooseAM/FM.
3. RotatetheTUNER(Fig.1)toselectaradiostation.
4. ToadjustthevolumeturntheVOLUMEknob(Fig.1)toyourdesiredlevel.
5. When finished listening to the radio you may turn it off by pressing the
POWERbutton.(Fig.1)
Note: Adjust the antenna on the back of the unit to better the radio
reception if needed. (Fig.3)
Using the Auto-Timer
When the power is on and you are listening to a nature sound or the radio
you may set a timer so the unit will automatically turn off.
1. TogglethroughtheTIMERbutton(Fig.1)untilyoufindthetimeofyourchoice,
15,30,45or60minutes.
2. Tocancelthetimer,togglethroughtheTIMERbuttonuntiltheLED
lightsays“OFF”orpressPOWER(Fig.1).
6 7
Assembly and Instructions for Use
1. Unpacktheproductandchecktomakesureeverythingisincluded(Fig.1).
2. This unit is powered by a DC adaptor.
3. ThebatterypowerisdesignedonlytoprovideMEMORYBACK-UPfortheclock
andalarmsettings.OneCR2032battery(included)isinsertedintothebattery
compartmentifmemoryback-upisdesired(intheeventofpoweroutagesorif
theunitisunplugged).Thememorybackupwillkeeptrackofthetimeandas
soon as the power supply returns, the display will indicate the correct time, and
the functions will become available again.
4. AttachtheadaptorintotheDCjackonthebaseoftheunit(Fig.3)andinsert
the cord into a 120V household outlet.
Setting Time
SETTING THE CLOCK(Fig.3):
1. SlidetheTimeZoneswitchtothecorrectzone.(P=Pacific/M=Mountain/
C=Central/E=Eastern)
2. Slidethe12/24switchtothedesiredsetting(24indicatesMilitarytime).
3. SlidetheDSTswitchtoeitherONorOFFtosetyourclocktoautomatically
adjustfortheDaylightSavingsTime(DST).
To set the DATE/TIME(Fig1):
PressandholdtheDATE/TIMESETbutton.
1. Theyearwillflash.Usethe+/-buttonstosetyear.
2. Whenyearisset,pressDATE/TIMESETbutton.Monthanddaywillflash.Press
the+/-buttonstosetmonth.Whenmonthisset,presstheDATE/TIMESETand
usethe+/-buttonstosetday.
3. Whenmonthanddayareset,pressDATE/TIMESET.Hourwillflash.Usethe+/-
buttonstosethour.NOTE:AM/PMchoicewillbemadeatthistime.
4. Whenhourisset,presstheDATE/TIMESETbutton.Minuteswillflash.Usethe+/-
buttons to set minutes. Minutes will flash for 10 seconds and then stop. Your clock
is set.