


A6826A PCI-X host bus adapter for Itanium Linux systems installation guide 13
Jumpers
The jumpers on the HBA are set to the default state of the laser and are set at the factory with a
jumper plug on pins 1-2 of the J3 jumper and on pins 1-2 of the J4 jumper.
CAUTION: Changing the jumper settings can result in the HBA being inoperable.
Before you begin installation
The HBA is self-configuring. However, some motherboards require manual configuration. See the
documentation supplied with your computer, or contact your computer dealer to determine if your
motherboard requires configuration.
Some motherboards have two kinds of PCI bus slots: master and slave. The A6826A must be in a
PCI bus master slot. (Some motherboards have PCI bus master slots that are shared with onboard
devices. The A6826A does not work in shared slots.)
PCI connectors vary among system HBA manufacturers. The A6826A is a 64-bit PCI device that can
function in a 32-bit PCI slot; the slot conforms to the PCI specification. The rear edge of the PCI slot
is notched.
CAUTION: If you try to install the HBA in a PCI slot that does not conform to the PCI specification,
you may damage the device.
PCI and PCI-X slots look the same. If the server contains both PCI and PCI-X slots, see the server
manufacturer’s instructions to determine the slot type.
The A6826A is designed and tested to operate at PCI bus speeds of up to 133 MHz.
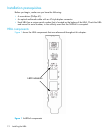
Installing the HBA
To install the HBA:
1. Check the motherboard and make any necessary configuration changes to accommodate the
HBA.
2. Power down the peripherals, then turn off the computer.
3. Remove the computer cover and save the screws.
4. Choose any PCI bus slot that supports bus mastering.
5. Most motherboards automatically assign an IRQ level and interrupt line; if your motherboard
does not, you must assign the IRQ level and use interrupt line A for this slot.
6. Remove the slot cover for the slot in which you will install the HBA.
7. Place the HBA in the slot. Carefully press the board into the slot until it seats firmly.
8. Secure the HBA to the chassis. Follow the server manufacturer’s instructions.
9. Connect the appropriate cable from the devices to the corresponding LC-connector.
10.Carefully reinstall the computer cover. Insert and tighten the computer cover screws.