


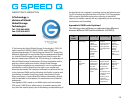

For an explanation of supported RAID levels, please refer to
Appendix A, “RAID Levels Explained”.
Note: Unlike the G-SPEED eS and G-SPEED eS Pro, you cannot
include more than one unit in any RAID conguration.
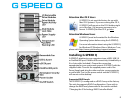
SPEED eS INSTALLATION GUIDE
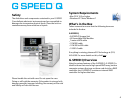
Changing the RAID Level
G-SPEED Q ships in RAID 5 mode, if you need to change it to
RAID 0, do the following steps:
1. Be sure all material you wish to save is backed up to a
separate disk. The following operation will destroy all
current material on the G-SPEED Q.
2. With the unit powered down, attach a USB 2.0 cable from
the computer to the G-SPEED Q.
Note: You cannot change the RAID level when connected via
eSATA or FireWire 800. You must be connected via USB 2.0
only.
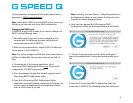
3. Download the G-Technology application, the G-
Technology RAID Conguration Utility here. This tool will
congure the G-SPEED Q appropriately.
4. Once downloaded, double click the disk image for the G-
Technology RAID Conguration Utility
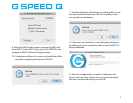
5. Open the G-Technology RAID Conguration Utility
application by double clicking it within the Disk Image. You
can also copy the Application to the Applications folder
and run it from there, if you like.
Note: Currently, you must Option + Drag the application to
the Applications folder to copy it there. It will not function
correctly by merely dragging it there.
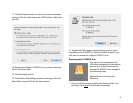
6. After you have opened the G-Technology RAID
Conguration Utility, the following dialog box will launch:
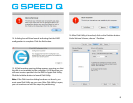
7. Click the Continue button and the Utility will begin to
search for available disks. A dialog box launches telling you
this.
8. After the G-Technology RAID Conguration Utility has
located the G-SPEED Q, the following dialog box will launch:
6