TION: Installation of screws that are longer than the origi-
nals may damage the LCD Board, flex circuits or the
threads.
To remove the Control Board, remove the Torx screw
(E) in the lower left-hand corner that supplies battery power
to the board. An earlier Front Cover Assembly has an addi-
tional screw located just below connectors J1/P1 (EE). Lift
the board and carefully unplug Speaker Flex plug P3 from
J3 on the Control Board. Avoid bending this or any other
flex circuits at sharp angles. The Control Board may now be
removed. Note the battery power and ground connections at
the bottom of the board where the screws have been re-
moved.
Speaker, Microphone and Flex Circuit Access
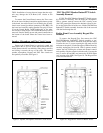
Remove the Control Board as previously stated and
then remove the six (6) Torx screws that secure the die-cast
shield. Remove the die-cast shield by lifting the top end first
and sliding it towards the top of the radio. The internal
speaker, microphone, Keypad and UDC Flex circuits are
now partially accessible. See Figure 9.
UDC Flex/UDC/Monitor Button/PTT Switch
Assembly Removal
If UDC Flex/UDC/Monitor Button/PTT Switch assem-
bly removal is necessary, first un-solder the microphone.
With a spanner wrench, remove the UDC securing screw
(the UDC ground pin). Remove the insulator (foam or plas-
tic) on the inside side-rail of the case. Lift the UDC/Monitor
Button/PTT Switch assembly from the side of the case and
slide the flex through the slot
Earlier Front Cover Assembly Keypad Flex
Removal
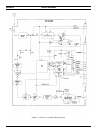
To remove the Keypad Flex, first remove the UDC
Flex/UDC/Monitor Button/PTT Switch assembly as pre-
viously stated. Next remove the knobs using the hex driver.
Unscrew the two (2) screws securing the top panel and lift
and remove the panel. Lift the Emergency Button Board by
carefully unplugging J6 from P6. With a spanner wrench,
remove the nuts securing the volume and channel controls
and carefully slide the controls inside the radio. Unscrew the
two (2) screws (G and GG) and remove the J10/P10 Zebra
strip securing plate (HH). See Figure 10. The Keypad Flex
is now free for removal.
Figure 10 - Keypad Flex And LCD Board Access
Figure 9 - Speaker, Microphone And Flex Circuit Access
LBI-38378
15


