


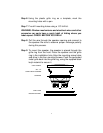
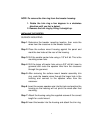
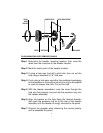
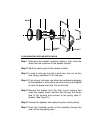

Step 8: Screw the bolts in until the tweeter housing is firmly
mounted to the panel. (Make sure the arrow at the rear of
the tweeter housing is pointing in the desired direction.)
Step 9: Insert the tweeter into the housing and attach trim ring.
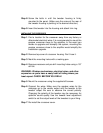
INSTALLING THE CROSSOVER
Step 1: Find a location for the crossover away from any factory or
aftermarket electrical wires. It is recommended to mount the
passive crossover close to the amplifier. In the event you
decide to upgrade and biamplify the system, mounting the
passive crossover close to the amplifier would simplify the
installation upgrade.
Step 2: Remove top cover of crossover housing. Don’t lose it.
Step 3: Mark the mounting holes with a marking pen.
Step 4: Remove crossover and pre-drill mounting holes using a 1/8”
drill bit.
WARNING: Window mechanisms, electrical wires, and other
expensive car parts have a nasty habit of hiding where you
least expect. CHECK BEFORE YOU DRILL!
Step 5: Mount the crossover using the supplied #8 screws.
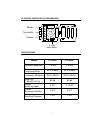
Step 6: Connect the wires. Make sure the speaker wires for the
midrange go to the woofer output and the tweeter to the
tweeter output. Be sure to observe the correct polarity.
Changing the polarity of the tweeter may be necessary for
optimum sound quality. Use the tweeter level adjustment
switch to set the output levels of the tweeters to your liking.
Step 7: Re-install the crossover cover.
8