


TOOLS OF THE TRADE
Listed below are tools you may wish to have on hand before starting
your installation. Having the proper tools will make the installation
much easier. Some of these tools are necessities, some will just
make the job easier.
• Marking Pen • Phillips Screwdriver
• Electric Drill • Volt/Ohm Meter (Optional)
• 1/4" Drill Bit • Assorted Tin Snips
• 1/8" Drill Bit • Wire Cutters
• 3/8" Drill Bit • Wire Crimpers
• Hole Saw Arbor • Wire Strippers
• 4¾" Hole Saw (5¼” woofer install.) • Razor Knife (Optional)
• 5¾" Hole Saw (6½" woofer install.)
• 1¾" Hole Saw (for flush mount tweeter install.)
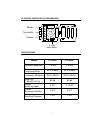
FINDING SPEAKER MOUNTING LOCATIONS
Choosing the correct speaker locations can have a significant effect
on the sound quality of the system. There are many different
considerations for choosing the locations that best suit your needs.
The locations must be large enough for the speakers to fit without
interfering with other vehicle parts such as window mechanisms,
etc. Care is needed to ensure that the location you have chosen will
not affect any of the mechanical or electrical operations of the
vehicle. If minimal intrusion in your vehicle is desired, factory
speaker locations may be the ticket for you. Placing the speaker in
the factory location can often give you very desirable results.
Alternative locations to consider include mounting in customized
kick panels, rear decks, or side panels.
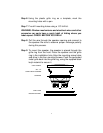
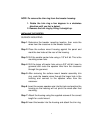
DOOR MOUNTING
When considering possible speaker locations in the doors, be sure to
check the operation of the window mechanism and all other moving
parts inside the door. Most vehicles use a stabilizer stop bar in
between the door and the door jamb.This bar prevents the door from
opening too far, but may intrude into the speaker mounting area
when the door is closed. Many do-it-yourself installers overlook this
and check for speaker clearance only when the door is fully open.
2