


| 7
6 | IBOOM JUKEBOX USERMANUAL
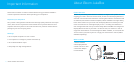
Getting Started
This section will help with the initial installation of your iBoom JukeBox.
1. Plug iBoom JukeBox into a wall outlet using the included AC Power Adapter.
2. Place the Display Remote on the charging bay on the back of the iBoom
JukeBox, ensuring that all of the charging contacts touch. Allow the Display
Remote to charge for at least four hours before using.
3. Place the appropriate Dock Insert for your iPod model (if necessary) into the
iBoom JukeBox dock. Then, place your iPod into the dock.
4. Press the On/Off Button on the top of iBoom JukeBox. Use the Play/Pause
Button, Previous/Next Track Buttons and Volume Buttons on your iBoom
JukeBox as needed.
5. Press the Play Button on the top of iBoom JukeBox. Once the Display Remote
is fully charged, you may use it to navigate and select your music.
NOTE: The volume control on your iPod is disabled while docked. Instead, use the
volume controls on the Display Remote or the iBoom JukeBox.
3
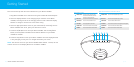
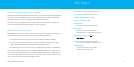
Press to turn iBoom JukeBox on and off.
POWER ON/OFF
5
6
VOLUME DOWN
Press to lower the volume on iBoom JukeBox.
Press to raise the volume on iBoom JukeBox.
VOLUME UP
2
Press once to skip to the next track.
Press and hold to fast forward the current track.
NEXT TRACK
4
Press to play/pause the current track.
PLAY/PAUSE
1
Press once to restart the current track.
Press twice to skip to the previous track.
Press and hold to rewind the current track.
PREVIOUS TRACK
3 4 5 61 2
When iPod is docked
5
6
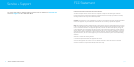
3
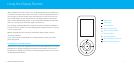
VOLUME DOWN
Press to lower the volume on iBoom JukeBox.
Press to raise the volume on iBoom JukeBox.
Press to turn iBoom JukeBox on and off.
POWER ON/OFF
VOLUME UP
4
Press to mute the current track. Press again to resume playback.
PLAY/PAUSE
When an audio device is connected via Aux-In
No function. Control playback using your device.
PREVIOUS TRACK
1
2
No function. Control playback using your device.
NEXT TRACK