


Trim Ring Mount Kits for the TPS-6X-DSW Crestron TMK/WMKT-6X-DSW
WMKT-6X-DSW Procedure
This section provides the necessary steps for the assembly and installation of the
WMKT-6X-DSW into a wall. Review the procedure and complete the steps in the
order provided. The only tools or materials required and not supplied are a drywall
saw or equivalent and a level.
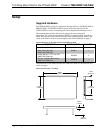
CAUTION: Allow an air gap of at least 12 inches (30.48 cm) in the wall cavity
above and below the TPS-6X-DSW for heat dissipation.
1. Locate an area on the wall that is free of miscellaneous wiring and
studs.
2. Make a small hole near the middle of the designated site; verify that the
location is suitable.
NOTE: Make the cutout as level and smooth as possible. The mounting plate allows
for only minor leveling adjustments. If a larger cutout is made accidentally, consider
purchasing the Crestron Mud Mount Kit, MMK-6X-DSW. Together with the
mounting plate supplied with the WMKT-6X-DSW, it provides a cost-effective
means of correction. Essentially, the combination of these two kits makes up the
Crestron Mud Mount Kit for the wall, WMKM-6X-DSW. Simply follow the
“WMKM-6X-DSW Procedure” in the latest revision of the Mud Mount Kits
Installation Guide (Doc. 6779).
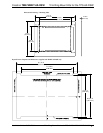
3. Use the drywall saw or equivalent, the level and the provided cutout
template to produce a level and accurate cutout in the drywall.
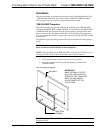
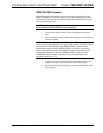
4. Insert the trim ring into the opening, as shown in the illustration on the
following page.
6 • Trim Ring Mount Kits for the TPS-6X-DSW: TMK/WMKT-6X-DSW Installation Guide – DOC. 6780A