


724-746-5500 | blackbox.com Page 15
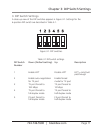
Chapter 6: Installation
6. Installation
This chapter gives step-by-step installation instructions for the converter.
6.1 Selecting a Site for the Equipment
As with any electric device, you should place the equipment where it will not be
subjected to extreme temperatures, humidity, or electromagnetic interference.
Specifically, the site you select should meet the following requirements:
• The ambient temperature should be between 32 and 113 degrees Fahrenheit (0 to
45 degrees Celsius).
• The relative humidity should be less than 95 percent, noncondensing.
• Surrounding electrical devices should not exceed the electromagnetic field (RFC)
standards for IEC 8013, Level 2 (3V/M) field strength.
• Make sure that the equipment receives adequate ventilation. Do not block the
ventilation holes on each side of the equipment.
• The power outlet should be within 6 feet (1.8 m) of the converter.
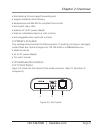
6.2 Connecting to Power
This Converter is a plug-and-play device.
Connect the supplied AC to DC power adapter to the receptacle on the rear panel
of the converter, and then attach the plug into a standard AC outlet.
6.3 Installing in a Chassis
LBMC300-MMST and LBMC300-MMSC fit into any of the expansion slots on the
compatible chassis, LB300A-RACK. Follow the steps described below.
First, install the converter onto a carrier supplied with the chassis:
Step 1: Unscrew the carrier from the desired expansion slot on the chassis.
Step 2: Fit the converter onto the carrier.
Step 3: When the converter is completely seated onto the carrier, insert the carrier
to the guide rails of the expansion slot.
Step 4: Carefully slide in the carrier until it is fully and firmly fit in the chassis. Fasten
the screws onto the carrier.
NOTE: Never insert any converter into the chassis directly without using the supplied
carriers. The carriers enable you to place the converters securely and
consistently without damaging them.