Playback with HOME MEDIA GALLERY inputs
07
75
en
Tip
•Press / or the numeric buttons to enter
alphanumeric characters. To delete alphanumeric
characters entered one at a time, press or
CLEAR. ‘Cancel Key Editing Lose Changes?’
appears when you press RETURN or while the
cursor is placed in the leftmost position on the
alphanumeric character entry screen. In this case,
press ENTER to cancel the editing screen, RETURN
to return to the editing screen.
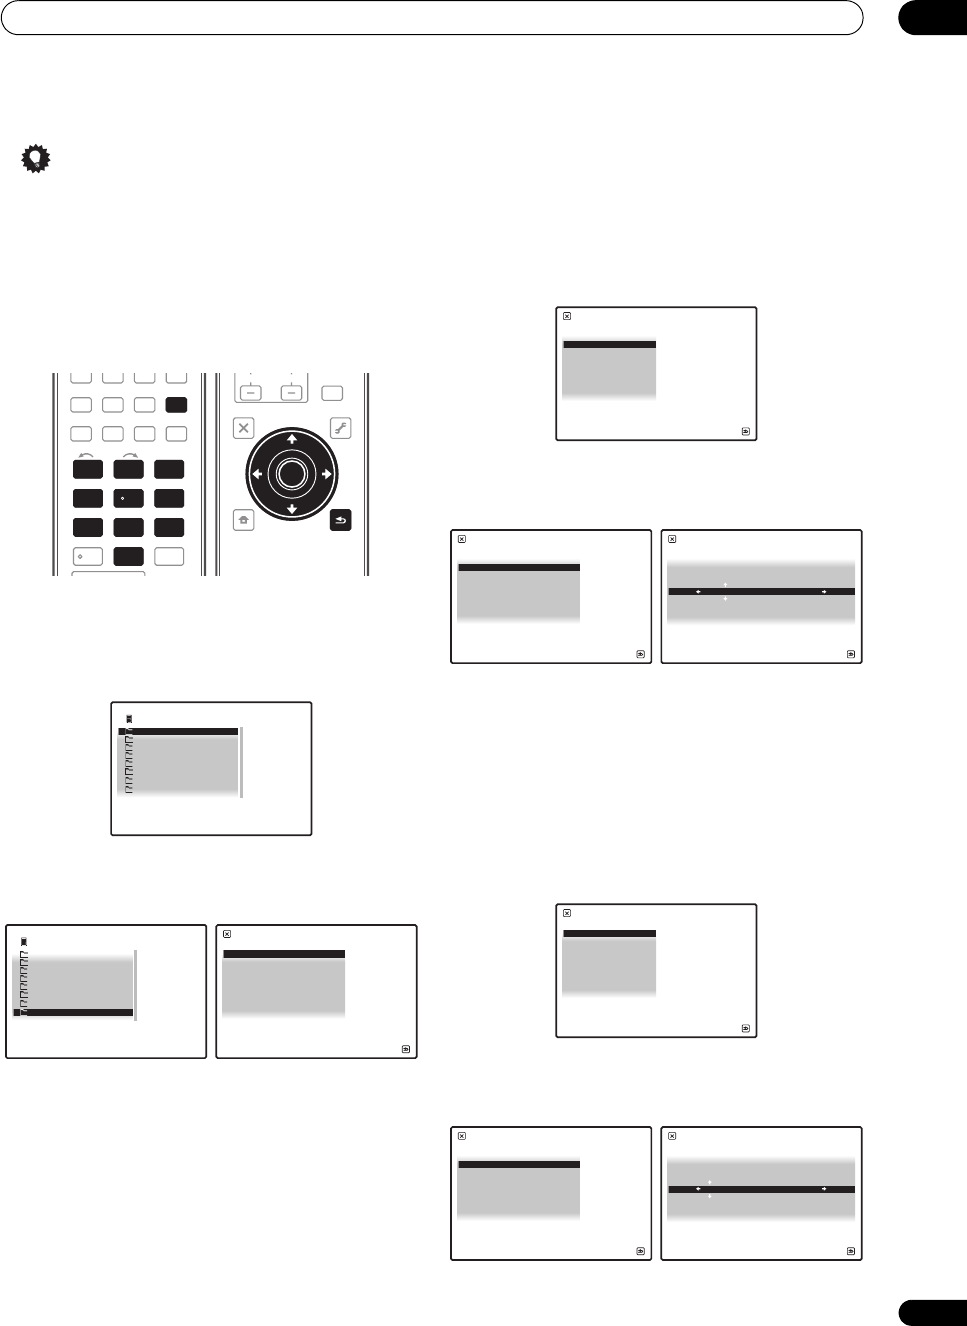
1Press
HOME MEDIA GALLERY
to select ‘Home
Media Gallery’ as the input function.
It may take several seconds for this receiver to access the
network. The following screen appears when the Home
Media Gallery is selected as the input function.
2 Select ‘
SETUP
’ and press
ENTER
to confirm your
selection.
The SETUP screen appears.
3 Select ‘
Network Setup
’ and press
ENTER
to confirm
your selection.
The Network Setup screen appears.
4Either ‘
Network Found
’ or ‘
No Network Found
’
appears. Check the network connection status and
press
ENTER
.
• Network Found – Connected to a component on the
network.
• No Network Found – Not connected to a
component on the network.
The Network IP Settings screen appears.
5Select ‘
Static IP Address
’ and press
ENTER
to
confirm your selection.
The IP address screen appears. When you select
‘Automatic (DHCP)’, the network is automatically set up,
and you do not need to follow Steps 6 to 7. Proceed with
Step 8.
6Select ‘
Change
’ and press
ENTER
to confirm your
selection.
The Edit IP address screen appears.
7 Enter the IP address.
Press / to select a number and / to move the
cursor. After you select the last number, press or
ENTER. You can also use the numeric buttons to enter a
number. The Enable Proxy Server screen appears.
8Select ‘
No
’ or ‘
Yes
’ for the proxy server setting to
deactivate or activate the proxy server.
In case you select ‘No’, proceed with Step 13. In case you
select ‘Yes’, on the other hand, proceed with Step 9. The
Proxy Hostname screen appears.
9Select ‘
Change
’ and press
ENTER
to confirm your
selection.
The Edit Proxy Hostname screen appears.
TV CD CD-R
TUNER XM SIRIUS
HOME MEDIA
GALLERY
iPod USB
123
HDMI OUT
SLEEPMCACC
INPUT
SELECT
SIGNAL SEL
456
DIMMERA.ATTSBch
789
CLASS
MASTER
CH LEVELD.ACCESS
/CLR
0
ENTER
HOME MEDIA
GALLERY
123
456
789
0
T.EDIT
GUIDE
TOP MENU
BAND
MUTE
RETURN
iPod CTRL
HOME
MENU
LIST
TOOLS
CATEGORY
AUDIO
PARAMETER
VOL
AUTO/ALC/
DIRECT
STANDARDSTEREO
MENU
ADV SURR
CH
ENTER
TUNE
PRESET PRESET
TUNE
VIDEO
PARAMETER
ENTER
RETURN
1/8
Top Menu
Internet Radio
Rhapsody
1
Sirius
Neural Music Direct
******
Favorites
Recently Played
Setup
A/V RECEIVER
8/8
Top Menu
Setup
Rhapsody
1
Sirius
Neural Music Direct
******
Favorites
Recently Played
Internet Radio
A/V RECEIVER
Information
Network Setup
Accounts
Setup
A/V RECEIVER
Return
Top Menu
1 / 3
Network IP Settings
A/V RECEIVER
Return
Top Menu
Automatic (DHCP)
Static IP Address
2 / 2
IP address
A/V RECEIVER
Return
Top Menu
192.168.000.002
Change
2/2
Edit IP address
A/V RECEIVER
Return
Top Menu
192.168.000.002
Enable Proxy Server
A/V RECEIVER
Return
Top Menu
No
Yes
1 / 2
Proxy Hostname
A/V RECEIVER
Return
Top Menu
abcdefghijklmnopqrstuv
Change
2 / 2
Edit Proxy Hostname
A/V RECEIVER
Return
Top Menu
abcdefghijklmnopqrstuv
SC-9540.book 75 ページ 2009年4月24日 金曜日 午後1時42分


