


41
12.6 GROUP SCAN OPERATION
Only Groups that are part of the radio's scan list will be scanned. Groups are added to the scan list on a per
system basis through programming, the radio keypad, or both, dependent upon programming. This scan list
can be changed by the user from the keypad unless programmed otherwise. Each system's group scan list is
retained in memory when the radio is turned off. The M7100
IP
Series mobile radio can also be programmed
to provide Trunked Priority Group Scan capability, which operates similar to priority scan in Conventional
mode.
The following is a description of programmable scan features that should be helpful in understanding the
Group Scan Operation of the radio:
Scan Hang Time - the delay time the radio waits before resuming scan after the push-to-talk is released or
after the carrier has dropped a channel.
TX Select - the group the radio will transmit on while scanning. The radio is programmed to transmit on
either the scanned group or the selected group.
Scan List (privileges) - this feature allows or prohibits scan list changes by the user.
P1 Programming - priority group programming is accomplished by one (and only one) of three methods:
• From the keypad, where the Priority programming is not fixed and does not follow the selected
channel,
• Priority 1 group programming follows the selected channel, or
• Priority 1 group programming is fixed during PC programming and cannot be changed by the
user.
P1 Always Scan - determines if the Priority 1 Group will always be scanned, regardless of the scan state
set by the user.
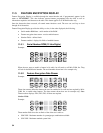
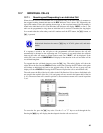
12.6.1 Adding Groups to a Scan List
1. With scan operation turned off, select the desired group to add to the selected Trunked system
group scan list.
2. Press < or > on the SCAN add/delete control. The current priority status of the group
will be displayed in column 1 of line 1 for a time-out period. If the group is not part of the
scan list the status will be blank.
3. While the status is displayed, press < to add the group to the scan list. "S" is displayed in
column 1, line 1.
4. Press < a second time to set the group to Priority 2. A "2" is displayed in column 1, line 1.
5. Press < a third time to set the group to Priority 1. A "1" is displayed in column 1, line 1.
The priority level selection sequence only advances the group to next higher priority level and
stops at priority level 1. To select a lower priority level, the group must be deleted from the
scan list and then added back to the scan list. Each new group added to the scan list starts at
the lowest priority. If the Priority 1 and Priority 2 groups are already set and a new group is
assigned as Priority 1 or Priority 2, the previously assigned group will change to non-priority
scanning.
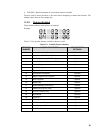
12.6.2 Deleting Groups from a Scan List
1. With scan operation turned off, select the desired group to delete from the selected trunked
system's group scan list.