


ENGLISH
FRANÇAIS
ESPAÑOL
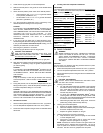
B. Operation Procedure
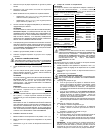
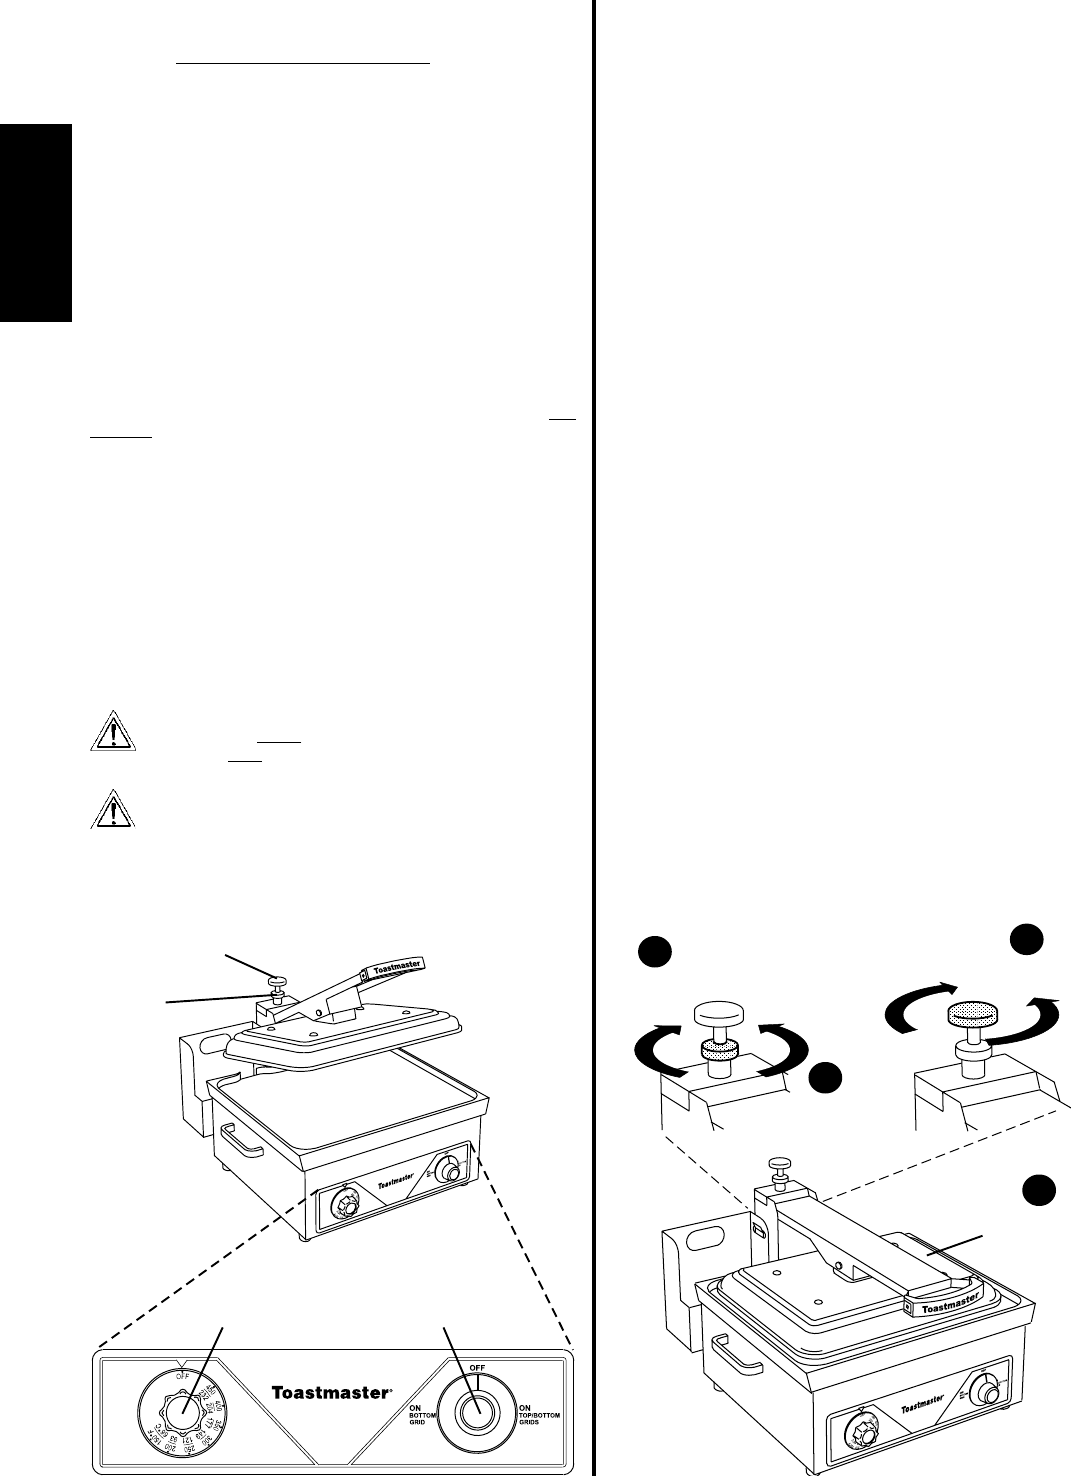
1. If necessary, adjust the closure height of the top grill plate as
described below. Refer to Figure 3.
Check that the top grill plate is lowered.
Loosen the closure height locking knob.
Turn the closure height adjustment knob as necessary to
raise or lower the top grill plate to the correct height. See
Figure 3.
- Turn the knob clockwise to raise the top grill.
- Turn the knob counterclockwise to lower the top grill.
If necessary, place a sample of the food product between
the grill plates to check for the correct spacing.
When the top grill plate is at the proper height, tighten the
closure height locking knob.
II. INSTALLATION
IMPORTANT
IT IS THE CUSTOMERS RESPONSIBILITY TO REPORT ANY
CONCEALED OR NON-CONCEALED DAMAGE TO THE FREIGHT
COMPANY.
A. Placement
Check that the four 5/8 (16mm) rubber feet are installed. Then,
position the sandwich grill in place.
B. Initial Cleaning
1. Ensure that any packing material has been removed.
2. Follow the procedure in Section IV, Daily Cleaning, to perform
an initial cleaning of the grill. Be sure to thoroughly clean the top
and bottom grill plates, AND the exterior of the grill.
3. If your grill is has grill plates with a natural aluminum finish,
condition the grills with a thin coating of cooking oil or shortening.
If your grill has a DuPont SilverStone Supra
®
coating, it is not
necessary to season the non-stick surface.
C. Electrical Utility Connection
IMPORTANT
THE ELECTRICAL CONNECTION TO THE SANDWICH GRILL RE-
QUIRES A CIRCUIT BREAKER/FUSED DISCONNECT. ELECTRI-
CAL SPECIFICATIONS ARE LISTED ON THE SERIAL PLATE (LO-
CATED ON THE REAR OF THE SANDWICH GRILL), AND ON THE
WIRING DIAGRAMS AT THE BACK OF THIS MANUAL.
CONSULT ALL APPLICABLE NATIONAL AND LOCAL CODES FOR
FURTHER ELECTRICAL CONNECTION REQUIREMENTS.
1. Before proceeding with the electrical connection, check the fol-
lowing:
a. Check that the electrical supply matches the sandwich grills
requirements. Refer to the serial plate (on the rear of the
unit) and to the electrical specifications at the back of this
Manual.
b. Check that the appropriate receptacle is available for the
power cord plug.
WARNING
ENSURE THAT BOTH THE CIRCUIT BREAKER/FUSED DIS-
CONNECT AND THE THREE-POSITION POWER SWITCH
ARE IN THE OFF (O) POSITION BEFORE PROCEEDING.
WARNING
ENSURE THAT ANY PACKING MATERIAL HAS BEEN RE-
MOVED FROM THE TOP AND BOTTOM GRILL PLATES.
3. Insert the power cord plug into its receptacle.
III. OPERATION
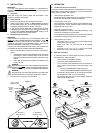
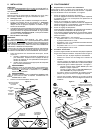
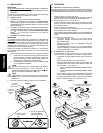
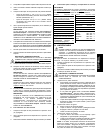
A. Location and Function of Controls
This section provides a basic description of the sandwich grills controls,
their location, and the functions they perform. The operator MUST be
familiar with the controls. See Figure 2.
1. Closure height adjustment knob
Adjusts the spacing between the top and bottom grill plates to
accomodate food products of different thicknesses.
2. Closure height locking knob
When tightened, prevents the Closure Height Adjustment Knob
from being turned. When loosened, allows the Closure Height
Adjustment Knob to be turned.
3. Temperature adjustment knob
Adjusts the temperature setting of the heating element(s). This
controls the temperature of the grill plates.
To change the temperature setting, turn the knob until the desired
temperature is aligned with the arrow above the knob.
4. Three-position power switch
When set to ON
BOTTOM GRID, turns on the heating element
for the bottom grill plate ONLY.
When set to OFF (O), turns off both of the heating
elements.
When set to ON
TOP/BOTTOM GRIDS, turns on the heating
elements for the top AND bottom grill plates.
Figure 2
1. Closure height
adjustment knob
2. Closure
height
locking
knob
3. Temperature
adjustment knob
4. BOTH/OFF/
BOTTOM switch
Figure 3
3
2
Loosen
locking knob
Turn adjustment knob
to reposition top grill
Raise
grill
Lower
grill
4
Tighten
locking knob
1
Check that top
grill plate is
lowered