


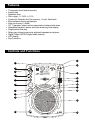
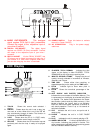
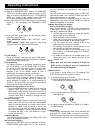
1. DISPLAY PANEL LCD-display for displaying the
different modes and functions.
2. SEARCH WHEEL This wheel has 4 forward and 4
reverse speed positions allowing you to quickly scan
through tracks. The more you turn the wheel in either
direction the faster you search.
3. TRACK BUTTON These buttons are used the
select a track. Tapping the button will forward/back
skip to the next track, holding down the button will
rapidly forward/back skip through the tracks.
4. IN BUTTON This function allows you to set a cue
point without music interrupt. This button also sets the
starting point of a seamless loop.
OUT BUTTON This button is used to set the
ending point of a loop. A loop is started by pressing
the IN button, pressing the OUT button set the loop
ending point. The loop will continue to play until the
OUT button is pressed once again.
5. RELOOP BUTTON If a seamless loop has been
made, but the CD player is not actively in seamless
loop mode (a loop is not playing), pressing the
RELOOP button will instantly reactivate the seamless
loop mode. To exit loop, press the OUT button. LOOP
and RELOOP will appear in the LCD display when
the reloop function is available. During play mode,
pressing the RELOOP button will instantly return play
the last set point without interrupt of music.
6. CUE BUTTON Pressing the CUE button during
playback immediately pauses playback and returns
the track to the last set cue point. In pause mode and
the CD is at the cue point, press the CUE button to
provide cue monitor. The red CUE LED will lit when
the CD is at the cue point.
7. PLAY/PAUSE BUTTON Each press of the button
to change from play to pause or from pause to play.
In skid mode, press this button to break or slow start.
8. SAMPLER BUTTON Press this button, then press
the desired BANK button to set the sampler mode.
When sampler mode is set, the audio sample will play
over (mixed with) the CD (if still playing). The audio
sample can even play when there is no disc inside.
The sampler will play once or continuous depending
on mode. Press sampler button once for continuous
play and LED is lit (static); Press button again for
single play and LED flashes. Press again to cancel
the sampler function and the LED is off.
9. MEMORY BUTTON Press this button to set the
memory mode, then press the desired BANK button
to memorize the music from the last cue point. The
music length to be memorized is determined by the
length of BANK. When the memory mode is set, the
MEMORY LED is lit. You can also memorize the
BANKs, FX’ parameter, and the last play mode (i.e.
time, single/continuous, pitch select, activated FX) by
pressing the memory for 1 sec. To recall the BANKs,
just activate the memory mode before you load a new
disc.
10. EJECT BUTTON Press this button to eject disc.
The disc will not eject unless the player is in Cue or
Pause, this is to prevent accidentally ejecting the disc
while in play mode.
11. KEY CORRECTION BUTTON This button is used
to activate Key Correction via the pitch controls. Key
Correction mode allows tempo change while
maintaining the original key. When the Key Correction
is selected, the LED above the KEY CORRECTION
button glows red.
12. PITCH ON/OFF BUTTON – This button is used to
turn the PITCH SLIDER function on and off.
13. 4%,8%,16%,100% PITCH SELECT BUTTON
Press the button in order to change pitch percentage
of 4%,8%,16%,100%.
14. BANK BUTTONS Press the desired BANK button
when the MEMORY LED is lit will set the memory
mode. The music from the cue point will be
memorized to the flash. Press the desired BANK
button when the SAMPLER LED is lit will set the
sampler mode. The sampler length is determined by
the smaller one of out point and bank length. Press
the desired BANK button will return to the start point
instantly. The LED of the BANK button last pressed
will be flashing.
15. PITCH SLIDER This slider is used to adjust the
playback pitch percentage. The slider is a set
adjustment and will remain set until the pitch slider is
move or the pitch function has been turned off.
16. TIME BUTTON The TIME button will switch the
time value described in the time meter between
elapsed play time, track remaining time, and total
remaining time.
17. SGL/CTN BUTTON This function allows you to
choose between single track play or continuous track
play (all tracks in order).
18. PITCH -/+ BUTTONS The desired pitch of CD
decrease or increase when button is pressing and
returns to the original pitch when the button is
released.
19. JOG WHEEL This wheel has two functions:
1. The jog wheel will act as a frame search control
when the CD in the pause or cue mode, allowing
you to set a point.
2. The wheel also works as a pitch bend during
playback. Turning the wheel clockwise will increase
the pitch percentage up to 100%, and turning the
wheel in the counter-clockwise direction will
decrease the pitch percentage down to –100%.
The pitch bend will be determined on how long you
turn the jog wheel continuously.
20. CD LED This LED is illuminated when the CD tray
is empty.