


57
Operating Instructions
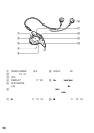
Setting the clock to stamp the
recorded time
See the illustrations in the Japanese text
(page17).
To stamp the date and time on the MD
when you record, you need to set the clock.
The recorder and the station each have a
clock. The time of the recorder is copied to
the clock of the station when you attach the
recorder to the station.
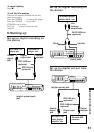
1 Press (clock set) button at
the rear of the station with a pointed
object. The digits of the year flash.
2 Enter the current year by pressing =
or +.
To change the digits rapidly, keep
pressing = or +.
3 Press ( or
The digit of the month flashes.
4 Repeat steps 2 and 3 to enter the
current month, date, hour, and minute.
After you press ( to set the minutes,
the clock starts operating.
If you make a mistake while
setting the clock
Press p button and repeat the steps above.
Press ( tto locate necessary digits to be
changed.
To display the time in the 24-hour
system
press
(display) button while setting
the clock. To change the clock to the 12-
hour system, press
(display) again.
Charging the built-in battery for the
clock
After setting the clock, leave the recorder
attached to the station for about 2 hours to
charge the built-in battery for the clock. Once
charged, the built-in battery will last for about
a month without being connected to any of the
power sources. The recorder will
automatically charge the built-in battery while
operating on the station, a rechargeable
battery or dry batteries.
3 Press P again to start recording.
4 Start the sound source.
Tips
• The recorder switches back to stereo
recording when you press p to stop
recording.
•If you record in monaural from a stereo
source using a digital cable, only the left
channel sound of the source will be
recorded.
•The MDs recorded in monaural can be
played back only with an MD player/
recorder that has the monaural playing
function.
Adjusting the recording level
(Manual recording)
See the illustration in the Japanese text
(page15).
When you record with a microphone or
analog input, the sound level is adjusted
automatically. If necessary, you can set the
level manually. You can operate in the
same way on the station as on the recorder.
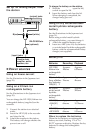
1 While holding down P, hold the
(record) switch to the right for more
than 2 seconds.
"ManualREC" appears, and the
recorder enters record pause mode. To
return to automatic control, while the
recorder is in record pause mode, hold
the (record) switch to the right for
more than 2 seconds.
2 Play the source.
3 While observing the level meter in the
display, adjust the recording level by
pressing + (+) or =(–).
Set the level to arround 12 (-12dB) on
the station or until 4 lines appear on
the recorder.
4 Press P again to start recording.
Tips
• The recorder switches back to automatic
control when you press p to stop recording.
• The recording level should be adjusted
while the recorder is in standby mode. You
cannnot adjust it while recording.
• Select the input level with the
(Mic sensibility) switch if you record sound
from (Mic) jack.