


C579M-A (5/05) 13
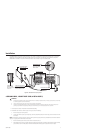
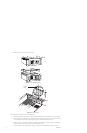
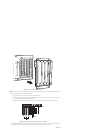
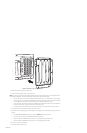
7. Mount external hardware. Refer to Figure 1 and do the following:
NOTE:
This procedure is for each individual port expansion assembly (one RP card and port expansion unit) and is to be duplicated for each RP
card installed in the CM9700-CC1. Power should not be applied until all physical connections have been secured.
a. Mount the port expansion unit so that the two supplied data cables will reach the CC1 unit. The data cables are three feet in length.
b. Connect the male end of one data cable to the bottom DB26 connector of the RP card installed in the CC1. Connect the other (female)
end to the DB25 host connector for the second grouping of 16 ports on the right side of the port expansion unit.
c. Connect the male end of the remaining data cable to the top DB26 connector of the RP card. Connect the other end to the DB25 host
connector for the first grouping of 16 ports on the left side of the port expansion unit.
d. If using RS-232 operation, set the switch located to the right of each port used on the port expansion unit to the “232” position.
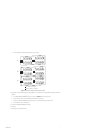
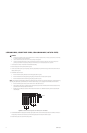
8. Connect peripherals to desired expansion ports. Refer to RP1, RP2, and RP3 in Figure 4.
9. Apply power to the CC1. After applying power, press the Delete key on the keyboard to enter into the BIOS menu settings, and then do the
following:
a. After “ENTER CURRENT PASSWORD” appears on the screen, type
PELCON
and then press the Enter key.
b. Using the arrow key, scroll down to PCI PLUG AND PLAY SETUP, and then press Enter.
c. Scroll down to PCI SLOT 1 IRQ PRIORITY. Change the setting to “5” by repeatedly pressing the Page Down key.
d. Scroll down to PCI SLOT 2 IRQ PRIORITY. Change the setting to “15” by repeatedly pressing Page Down.
e. Scroll down to PCI SLOT 3 IRQ PRIORITY. Change the setting to “3” by repeatedly pressing Page Down.
10. Press the Esc key to return to the BIOS menu.
11. Scroll down to PERIPHERAL SETTINGS, press Enter, and then do the following:
a. Scroll down to ONBOARD SERIAL PORT 2.
b. Change the setting to DISABLED by pressing Page Down.
c. Press Esc.
d. Scroll down to SAVE SETTINGS AND EXIT and type
Y
e. Press Enter.
12. Reboot machine by pressing Ctrl+Alt+Del.