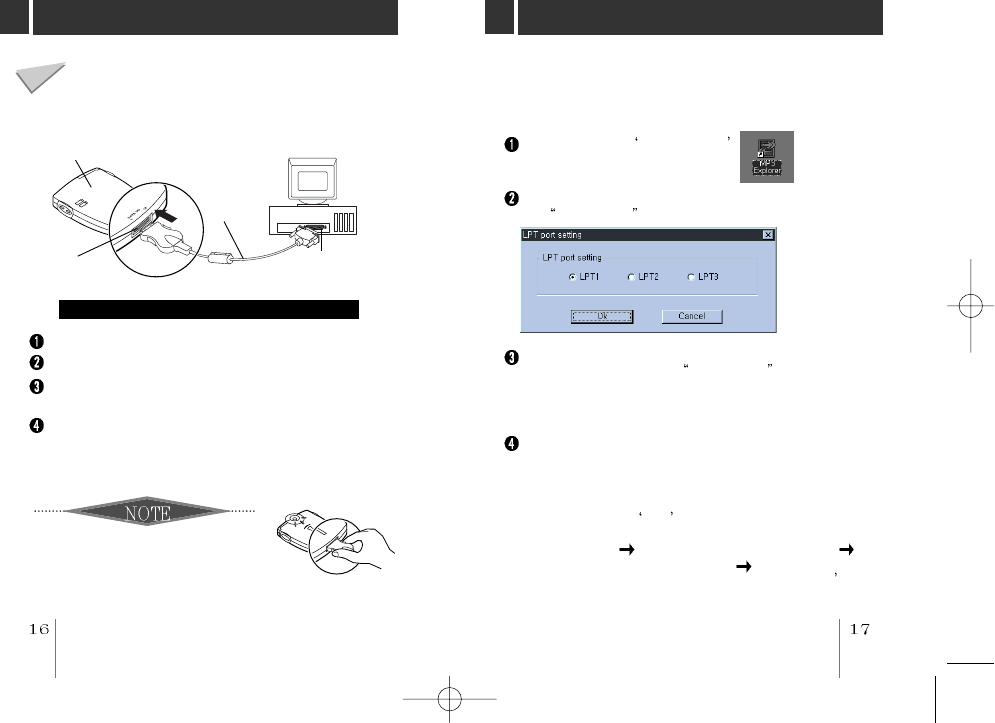
CONNECTING DATA IN/OUT CABLE
To complete setup, you should connect the supplied
Data In/Out cable to a PC from your MP3 Player.
Disconnect the printer cable from your PC.
Put your MP3 Player to stop mode.
Open the rubber cover of Data In/Out terminal from
your MP3 Player.
Connect one end with the parallel port on the back of
your PC and then plug the other end into the Data
In/Out terminal of your MP3 Player.
MP3 Player
DATA
In/Out terminal
Data In/Out
cable
Parallel port
(Printer Port)
Connecting your MP3-Player to a PC
Compare the two ends of the cable
To remove the plug of the MP3 Player
side, push and pull both grips of the plug.
OPEN MP3-Explorer
Double-click the MP3-Explorer
icon on the Windows desktop.
In case of first run after the MP3-Explorer installation,
the Parallel port Options dialog box will be displayed.
To communicate between your MP3 Player and your
PC, you must select the Parallel Port option. The
default port is set to LPT1. Make sure your MP3 Player
is properly connected to the Parallel Port of your PC
with the supplied Data In/Out cable.
The first time you open the MP3-Explorer after setup, if
it does not run, check the LPT MODE of the CMOS
SETUP of your PC. And confirm if it is SPP MODE
(STANDARD or OUTPUT ONLY).
* You can check the LPT MODE during the booting of
your PC. Press DEL key during booting of your PC
to enter the CMOS SETUP and then enter to the
MAIN MENU ADVANCED SYSTEM SETUP
INTEGRATED PERIPHERALS LPT MODE (It may
be different according to your PC, refer to User s
Manual of your PC)
The MP3-Explorer is the software that interacts with the
MP3 Player and a PC.
MP3 files or any data files can be downloaded to the MP3
Player or vice versa.
