72
PROFESSIONAL WEATHER CENTER
WS-1515U-IT
Instruction Manual
Table of Contents
Topic Page
Features 3
Setting up 6
Function keys 12
LCD Screen 14
Manual Setting 16
Time alarm setting 24
Weather alarm operations 25
Hysteresis 31
Weather forecast and weather tendency 32
Wind direction and wind speed measurement 36
Rainfall measurement 37
Viewing history data 37
Viewing the min/ max weather data 39
Switch On/ Off buzzer 46
Outdoor transmission 915 MHz reception 48
Positioning 49
Care and Maintenance 53
Specification 54
Warranty Info 57
73
Congratulations on purchasing this state-of-the-art Professional Weather
Center as an example of excellent design and innovative technology.
Featuring time, date, calendar, weather forecast, wind direction and speed,
rainfall, indoor temperature, outdoor temperature and outdoor humidity, air
pressure and various alarm settings for different weather conditions, this
Weather Center will provide you with extensive weather information and
forecast.
FEATURES:
Weather Center
• Time display (manual setting)
• 12/24 hour time display
• Calendar display (weekday, date, month, year)
• Time alarm function
• Weather forecasting function with 3 weather icons and weather
tendency indicator
• Dew point display in ºF/°C
• Outdoor temperature display in ºF/°C
• Outdoor Humidity display as RH%
• MIN/MAX value of outdoor temperature and humidity display with
time & date of recording
• Indoor temperature display in ºF/°C
• Display MIN/MAX value of outdoor temperature, outdoor humidity,
dew point, wind chill and relative pressure with time and date of
recording
INSTANT TRANSMISSION is the state-
of-the-art new wireless transmission
technology, exclusively designed and
developed by LA CROSSE
TECHNOLOGY. INSTANT
TRANSMISSION
offers you an
immediate update (every 4.5 seconds!)
(6.5 SECONDS FOR RAIN) of all your
outdoor data measured from the
transmitters: follow
our climatic
This product offers:
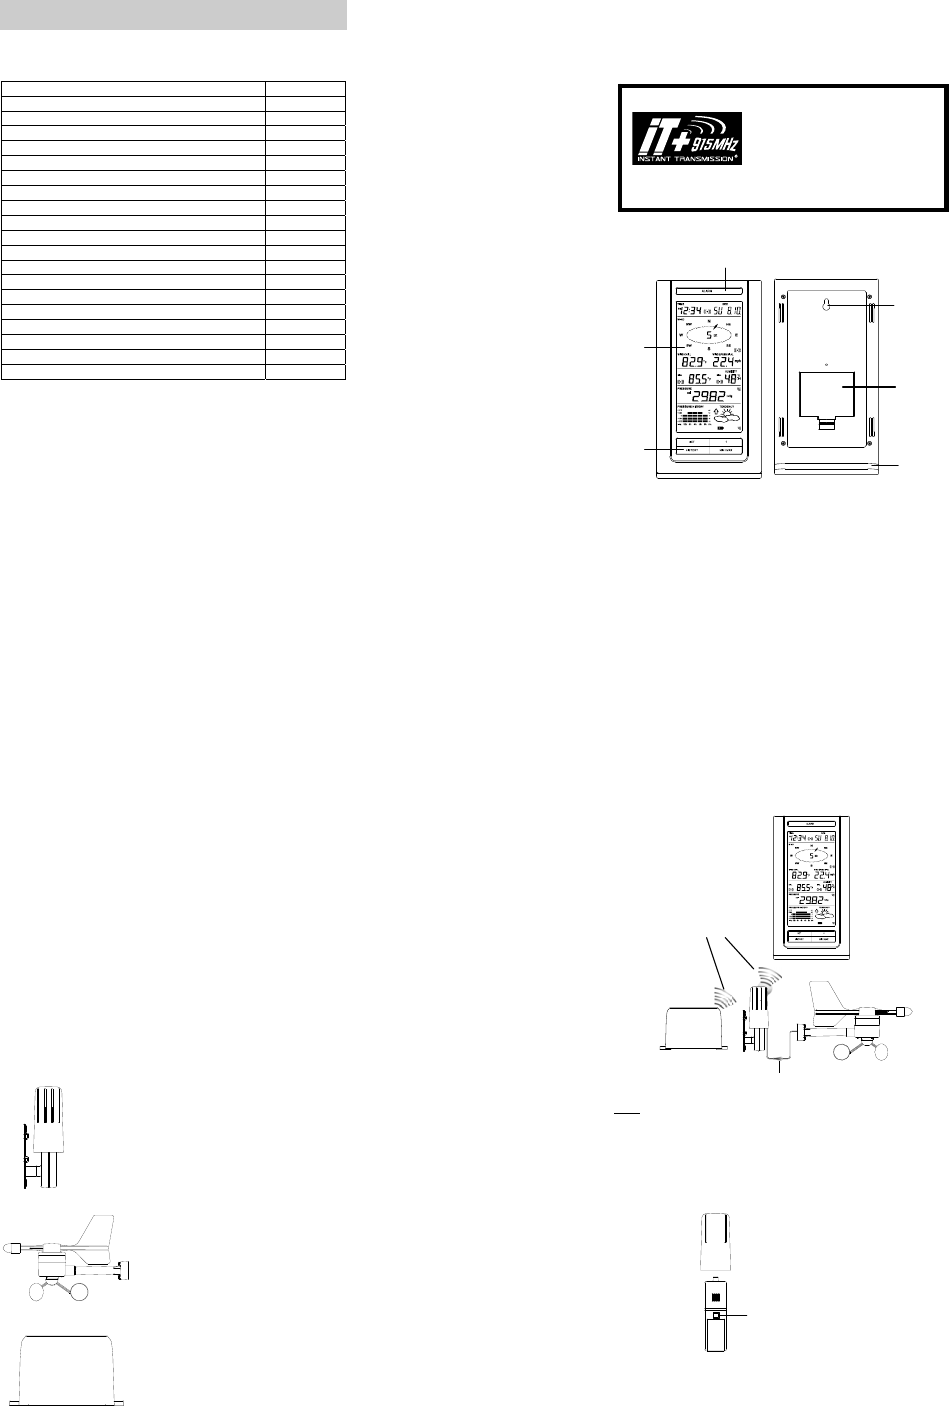
Function
keys
LCD
Stand
Battery
compartment
Hanging hole
Function keys
74
• Low/High outdoor temperature and humidity alarm
• Relative air pressure displayed in inHg or hPa
• Air pressure tendency indicator for the past 12 hours (bar graph
format)
• LCD contrast selectable
• Low battery indicator
• Wind direction displayed in 16 steps
• Wind speed and gust displayed in mph, km/h, or m/s, and Beaufort
scale
• Wind chill displayed in F of C
• High alarm function for wind speed
• Manual reset of outdoor temperature, outdoor humidity, dew point,
wind chill, pressure, wind speed, gust, and 24h rainfall
• 24h rainfall display in inch or mm
• Total rainfall display in inch or mm
• Storm warning alarm
• Buzzer on/off selectable
• Storage of 140 sets of history weather data recorded in 3-hour
intervals
• Wireless transmission at 915 MHz
• Transmission range up to 330 feet (100 meters)
• Back –light? (To be confirmed by LCU)
Thermo-hygro Sensor
• Remote transmission of the outdoor temperature
and humidity to the Weather Center at 915 MHz
• Weather-resistant casing
• Wall mounting case (to be mounted in a sheltered
place. Avoid direct rain and sunshine)
Wind Sensor
• Connected to the thermo-hygro sensor
by cable
• Can be installed onto a mast or a
horizontal panel
Rain Sensor
• Remote transmission of the rainfall
data to the Weather Center at 915 MHz
• To be mounted onto a horizontal panel
75
Cable connection between the wind
sensor and the thermo-hygro sensor
Wireless transmission
at 915 MHz - thermo-
hygro and rain sensor
to the Weather Center
Weather Center
Wind sensor
Rain sensor
Sockets for wind sensor
SETTING UP:
Note:
When putting the Weather Center into operation, it is important to perform
in close proximity (e.g. on a table) a complete wiring and set-up of the
system. This step is important to test all components for correct function
before placing and mounting them at their final destinations (See
Positioning below) Spin the wind vane and tip the rain gauge to test.
1. Unwind the cables of the Wind sensor. Connect the Wind sensor to
the Thermo-hygro transmitter by plugging the connector head into the
socket of the Thermo-hygro sensor.
2. First insert the batteries into the Thermo-hygro sensor and Rain
sensor “How to install and replace the batteries into the Thermo-
hygro sensor“ and “How to install and replace the batteries into
the Rain sensor” below).
3. Then insert the batteries into the Weather Center (see “How to
install and replace the batteries into the Weather Center” below).
Once the batteries are installed, all segments of the LCD will light up
briefly and a short signal tone will be heard. It will then display the
time as 00:00, the date as 1.1.05, the weather icons, and air pressure
value. "- - -" will be shown for outdoor data.


