


INSTALLATION STEPS (cont.)
REFER TO PAGE 5. If optional kits are used, follow
instructions included with them.
1. Close the cold water side shutoff valve. (Usually,
there already is a shutoff under the sink. If not, close
the main water shutoff valve near the water meter or
pressure tank.)
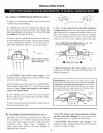
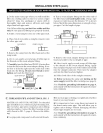
2. Cut and remove a section of the cold water pipe.
3. If plumbing with flexible tubing, hang or support
the filter housing in some manner. If using rigid
pipe, be sure to allow a minimum of 1-1 / 2" clearance
under the filter for sump removal when changing the
filter cartridge.
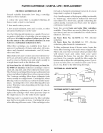
4. Use the plumbing procedures on page 5 if using
compression fittings. Follow procedures on pages 5
and 6 for sweat copper and threaded pipe installa-
tion. Be sure water flow is into the filter inlet side
and from the outlet side to the faucet.
Note: A grounding jumper wire is not required.
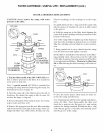
5. Before turning on the water supply remove the
sump from the filter head and install the filter car-
tridge (see below).
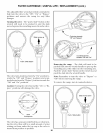
FILTER CARTRIDGE INSTALLATION
TURN TO PAGE 9 AND FOLLOW ALL STEPS UNDER "FILTER CARTRIDGE REPLACEMENT".