


9
English
Receiving FM Stations with
RDS
You can use the RDS (Radio Data System) by using the buttons on
the Unit and the Remote Control.
RDS allows FM stations to send additional signals with their
regular program signals. For example, the stations send their station
names, and information about what type of programs they
broadcast, such as sports or music, etc. This Unit can receive the
following types of RDS signals:
PS (Program Service):
shows commonly known station names.
PTY (Program Type):
shows types of broadcast programs.
RT (Radio Text):
shows text messages the station sends.
EON (Enhanced Other Networks):
provides the information about the types of the programs sent by
other RDS stations.
What information can RDS signals provide?
The display shows RDS signal information that the station sends.
Showing the RDS signals on the
display––––––––––––––––––––––––––––––––
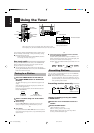
Press the DISPLAY MODE button on the
Remote Control while listening to an FM
station.
Each time you press the button, the display changes to show
information in the following order:
PS (Program Service):
While searching, “PS” appears, then station name is displayed.
“NO PS” appears if no signal is sent.
PTY (Program Type):
While searching, “PTY” appears, then broadcast program type is
displayed. “NO PTY” appears if no signal is sent.
RT (Radio Text):
While searching, “RT” appears, then a text message sent by the
station is displayed. “NO RT” appears if no signal is sent.
Frequency:
Station frequency (non-RDS service)
To search for a program using the PTY codes
REMEMBER you must preset FM RDS stations to use the EON
function. If not yet done, see page 8.
Notes:
• If searching finishes at once, “PS”, “PTY” and “RT” will not
appear on the display.
• If you press the DISPLAY MODE button while listening to an
AM (MW/LW) station, the display only shows station
frequency.
• RDS is not available for AM (MW/LW) broadcasts and for
some FM broadcasts.
4 Press the UP, DOWN, > or < button within
5 seconds to select the preset number.
UP or > button: Increases the preset number by 1.
DOWN or < button: Decreases the preset number by 1.
• When the > or < button is held down, the preset number
changes rapidly.
5 Press the SET button within 5 seconds.
“STORED” appears and after 2 seconds, the display returns to
the broadcast frequency display.
6 Repeat above steps 1 to 5 for each sta-
tion you want to store in memory with a
preset number.
To change the preset stations, repeat the same steps as above.
Presetting stations automatically –––
In each band, you can automatically preset 30 FM and 15 AM
(MW/LW) stations. Preset numbers will be allocated as stations are
found, starting from the lowest frequency and moving up the
frequency.
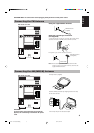
1 Select a band by pressing the FM/AM
button on the Unit (or the TUNER BAND
button on the Remote Control).
2 Press the AUTO PRESET button on the
Remote Control for more than 2 seconds.
3 Repeat steps 1 – 2 for the other band.
■ If you want to change the preset stations, carry out the Manual
Presetting for the desired preset numbers.
CAUTION:
Even if the system is unplugged or if a power
failure occurs, the preset stations will be stored
for about 24 hours. However, in case the preset
stations are erased, you will need to preset the
stations again.
Changing the FM Reception
Mode
When you have tuned into an FM stereo broadcast, the STEREO
indicator lights up and you can hear stereo effects.
If an FM stereo broadcast is hard to receive or noisy, you can select
Monaural mode. Reception improves, but you lose any stereo
effect.
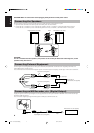
Press the FM MODE button on the Remote
Control so that the MONO indicator lights up
on the display.
To restore the stereo effect, press the FM MODE button on
the Remote Control so that the MONO indicator goes off.
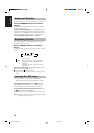
AUTO
PRESET
TUNER
BAND
(For more than 2 seconds)
PS PTY RT Frequency
DISPLAY MODE
MONO
STEREO
FM MODE
EN01-11.UX-V30R/V330R[E] 00.1.20, 5:41 PM9