POWER SOURCE
This product operates on 120VAC/60Hz household electrical outlet
voltage. For clock memory back-up you need to install one 9V battery
(not included) to the battery clip located inside the Battery
Compartment (#4). The battery helps retain the time and alarm settings
in memory in the event of a power outage, but will not display it on the
Clock Display (#7). Normal display and functions will resume when the
power is restored. We recommend checking and/or replacing the
battery every one to three months. If the battery is weak, replace it
immediately. For maximum performance we recommend using a good
quality battery (such as Eveready type 6F22 or equivalent).
RADIO OPERATION
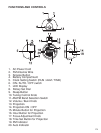
1. Set the ON/AUTO/OFF Switch (#6) to “ON” position.
2. Set the AM / FM Band Selection Switch (#11) to desired band.
3. Tune to the desired station with Tuning Control (#10).
4. Adjust the volume level with Volume Control (#12).
5. For best FM reception, fully extend the FM Antenna Wire. For best
AM reception, try turning the unit slowly until the best station
reception is obtained.
6. The radio can be switched off by setting ON/AUTO/OFF Switch (#6)
to the “OFF” position.
Note: Do not connect the FM Antenna wire to any other external
antenna.
SETTING THE CLOCK TIME
1. Set the Clock Setting Switch (#5) to the time set position. The 2 dots
between the hour and minutes will begin flashing.
2. Rotate the Rotary Set Dial (#8) counterclockwise for adjusting the
current minute or clockwise for adjusting the current hour.
3. A “PM” Indicator (#19) is located on the LED Clock Display (#7) in the
upper left-hand corner. The time will be in the “AM” range when the
“PM” indicator is not lit. It is important that the "AM" or "PM" setting is
correct for proper operation of the alarm function.
4. Once the time is adjusted, set the Clock Setting Switch (#5) to the
“RUN” position. The 2 flashing dots will stop flashing.
P5