


This unit has a dual alarm system so you can set two separate alarms to different alarm times, wake-to sources and
schedules (daily, weekdays or weekend).Tip: Download the free iHome Set app for advanced alarm, snooze and sleep
functions
Setting the Alarms
Note: Alarm 1 and Alarm 2 are set the same way; Alarm Button below means the button ( or ) for whichever
alarm you are setting.
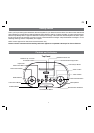
1. Press and hold the or Button until the alarm time flashes on the lower part of the display. Press and release
the + or – Button to set the alarm time (press and hold for faster setting). Remember to set the correct AM or PM
time.
2. Press and release the Alarm Button again to confirm the set alarm time, then press and release the + or – Button
to set the alarm schedule (‘7 DAYS’ = the whole week, ‘5 DAYS’ = Monday through Friday, ‘2 DAYS’ = Saturday
and Sunday only).
3. Press and release the Alarm Button again, then press and release the + or – Button to select an alarm source to
wake to: (iPod, Radio, or Playlist).
For wake to iPod: select iPod to wake to a docked iPad, iPhone or iPod. If the unit does not detect an
iPad/iPhone/iPod at the set alarm time, the unit will default to buzzer alarm. The alarm cycle lasts for one hour;
make sure you have enough music on your iPad, iPhone or iPod to last that long.
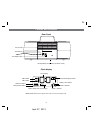
For wake to radio: after selecting Radio as the wake to source, press and release the Alarm Button and press
and release the + or – Button to select a radio station or press and release the Button to select a preset radio
station to wake to (see Listening to Radio on page 7 for details on setting radio stations and presets).
For wake to playlist: you must create a playlist named “iHome” in iTunes and have it on your iPad/iPod/iPhone.
The unit will play music randomly from within the “iHome” playlist.
Setting Time and Calendar Manually
Autosync must be OFF to set the clock manually.
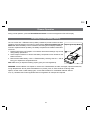
1. Press and hold the Time Set/Sync Button located on the top of the unit until “SYNC ON” or “OFF” flashes on the
display, (if “SYNC ON” appears, press the + or – Button to toggle to “OFF” setting).
2. Press and release the Time Set/Sync Button. The time display will flash. Press the + or – Button to adjust the
time (hold for a few seconds to advance or reverse rapidly). Remember to set the correct AM or PM hour. An icon in
the upper left hand corner of the time display indicates AM or PM.
(Note: if you wish to change the time display from the 12-hour format to the 24-hour format, sometimes called
‘military time’, press and release either the or Button to switch between 12-hour and 24-hour display
formats.)
3. Press the Time Set/Sync Button again. The year will flash in the lower part of the display. Press the + or –
Button until the current year is displayed.
4. Press the Time Set/Sync Button again. The month and date will flash. Press the + or – Button until the current
month and date is displayed. Hold to advance rapidly.
5. Press the Time Set/Sync Button once more. Two beeps will sound to confirm your settings and you will exit Time
and Calendar Setting mode. The lower part of the display will show the date.
6
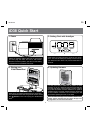
Using the iD38
Using the Alarms
P8