


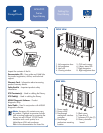


Install the Library
into the Rack
Connecting the
SCSI Cables
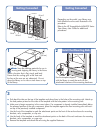
Note: Rail front brackets are threaded to
directly accept screws. Rear brackets are
not threaded and require installation of
cage nuts in the rack enclosure’s rear
vertical rails. See the documentation
provided with your rack enclosure for
detailed installation instructions.
Caution: Fully tighten the front rail
screws. Leave the rear rail screws finger
tight to prevent binding when installing
the library.
Front of rack
3
Back of rack
1
2
4
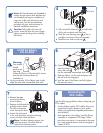
f. Fully extend the slide rails 1 on both sides
of the rack enclosure until they lock.
g. Slide the inner bearing race 2 as far as
possible to the front of the rail assembly.
h. Install the two slide-on clip nuts 3 .
5
1
2
3
6
War ning:
Two people
should
perform the
next step.
When the library is fully extended, ensure
that the rack enclosure does not
overbalance.
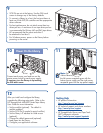
a. Using two people, lift the library and visually
align the inner and intermediate slide rails.
b. Carefully
insert the library’s
inner slide rails 3
into the extended intermediate slide rails 2 .
c. Slide the library into the rack enclosure until
the rail locks are engaged.
d. Level the rear of the library and fully tighten
the rear rail screws.
Retaining screws
8
e. Remove the tape
securing the library
doors in place.
f. Remove and discard the
pull-tabs used to block
the latch mechanism
when closing the doors.
g. Secure the front panel
to the rack enclosure using the retaining
screws and then close the doors.
Note: Two-drive libraries require four
retaining screws; four-drive libraries
require two retaining screws.
Use the following guidelines when configuring your
SCSI cables:
• Use the highest quality SCSI cables. Bus errors
caused by excessive length or poor quality
cables can significantly degrade performance
and reliability.
• Each tape drive in the library (and the library
controller) is a separate SCSI target. When
more than one device is connected to the same
bus, each separate device must be assigned a
unique SCSI ID.
7