


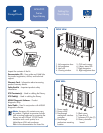


Getting Connected
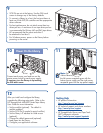
Install the Mounting Rails
Getting Connected
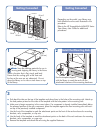
4-drive models
Drive 1
Drive 0
Drive 3
Drive 1
Drive 0
Drive 2
18"
18"
(50 cm)
(50 cm)
12
3
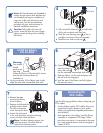
Depending on the model, your library may
look different from the ones illustrated in this
procedure.
Refer to the HP StorageWorks MSL6000 Series
Tape Library User Guide for additional
procedures.
Note: Save the packing materials for use in
moving and shipping the library in the future.
Select a location that is flat, sturdy, and level.
Ensure that the cooling grills at the front and
the fans at the rear are not obstructed. Do not
place the library on its side or stack items on top
of the library.
Use the template shipped
with the library to mark the rack with the
attachment locations of the mounting hardware.
a. Push back the tabs on the top of the template and place them in the holes of the mounting rails. Match up
the hole pattern printed on the sides of the template with the hole pattern in the mounting rails.
b. Make sure to begin measuring in the correct place. If a component is already installed immediately below
the planned position of the new component, place the template against the front mounting rails and rest it
on top of the previously installed component.
c. Use the front of the template to mark the attachment points on the front of the rack enclosure for mounting
brackets, rails, components, or clip nuts.
d. Use the back of the template to mark the attachment points on the back of the rack enclosure for mounting
brackets, rails, components, or cage nuts.
e. Remove the template and attach the rails using the supplied fasteners.