


MPX-40 PROFESSIONAL EFX CD PLAYER
INTRODUCTION:
Congratulations on purchasing the G
EMINIi MPX-40
PROFESSIONAL
EFX MP3 CD PLAYER
. This state of the art pro-
fessional CD player is backed by a ONE year warranty, and a 90 day
warranty on lasers. Prior to use, we suggest that you carefully read all
the instructions.
FEATURES:
- Audio CD, MP3, CD-R, & CD-RW compatible
- Slot-loading CD mechanism
-Full MP3 File and Folder Search
- Disc identification system for memorizing cue points
- Touch-sensitive jog wheel
- 3 fly cues & 2 eight second sampler banks
- 10 sec. Anti-shockTM protection using RAM buffer memory
- Seamless loop with reloop & B-edit
- Key lock & BPM counter
- Pitch bend via jog wheel or buttons
- Variable pitch slide control with ranges of 4%, 8%, 16%, 100%
- Adjustable brake control & reverse
- +10 track selection
- Dual jog mode function
- Single/continuous play modes
- Three time display modes
- Large blue backlit LCD display
- Coaxial RCA digital output
- Sleep mode
SAFETY CERTIFICATIONS:
Laser Diode Properties
Material: Ga - Al - As
Wavelength: 755 - 815 nm (25° C)
Laser Output: Continuous Wave, max. 0.5mW
CAUTIONS:
1. Do not use this CD Player at temperatures below 41°F/5°C or
higher than 95°F/35°C.
2. The apparatus should not be exposed to dripping or splashing &
no objects filled with liquids such as vases should be placed on the
apparatus. Place the unit in a clean & dry location.
3. Do not place the unit in an unstable location.
4. When disconnecting the power cord from an AC outlet, always
grasp it by the plug. Never pull the power cord.
5. To prevent electric shock, do not remove the cover or the bottom
screws. There are no user serviceable parts inside. Please refer serv-
icing to a qualified technician.
6. Do not use chemical solvents to clean the unit.
7. Keep this manual in a safe place for future reference.
8. In the USA ~ if you experience problems with this unit call
G
EMINI CUSTOMER SERVICE at: 1 (732) 346-0061 or visit
HTTP://WWW.GEMINIDJ.COM/SUPPORT.HTML. Do not attempt to
return this equipment to your dealer.
LINE VOLTAGE SELECTION:
Model MPX-40 is a dual voltage units. It will operate
at 115 V or 230 V. To set the proper voltage, follow these
steps:
1. Place the head of a screwdriver in the groove of the V
OLTAGE
SELECTOR
SWITCH
(1) found on the rear panel.
2. Flip the switch to 115 V or 230 V.
3. Do not force or twist the switch. Excessive force may cause
damage. If the switch does not move smoothly, contact a qual-
ified technician.
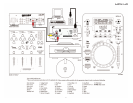
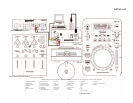
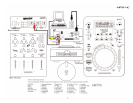
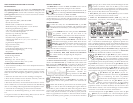
CONNECTIONS:
1. Before making any connections, please make sure the P
OWER
SWITCH (4) is in the OFF position. All connections are located on the
rear panel of the CD player. Please refer to the diagram of this
model on page 3.
2. Included with your MPX-40 is a P
OWER CORD (2).
Plug one end of the power cord in to the AC I
N
(3). Plug
the other end in to the nearest available power output.
3. Plug one end of a set of RCA cable connectors into the RCA
O
UTLET (5).
4. Plug the other end of the RCA connectors into any avail-
able line level input jacks on your mixer. If you are playing
the MPX-40 through a receiver, you can plug the RCA con-
nectors into the CD or AUX input jacks on your receiver. If
there are no CD or AUX inputs, use any line level (except
phono) inputs.
5. The D
IGITAL OUT (6) jack is for connecting this unit to any
type of computer, DAT, MD, HARD DISC RECORDER, or any
other type of device that accepts digital signals.
FUNCTIONS:
1. P
OWER SWITCH: After making sure that the VOLTAGE SELECTOR
SWITCH (1), found on the rear panel, is properly set, plug the unit in
& press the P
OWER SWITCH (4) to ON. The unit will turn ON & the
blue LCD (16) screen will illuminate. Turn OFF the unit by pressing
the POWER SWITCH (4) to OFF to when not in use.
2. D
ISC IN SLOT: The DISC IN
SLOT (7) is where the CD is held.
When a disc is in the slot, the
blue LED & bar will be illuminated above the slot & the LCD (16)
will show the total tracks & time on the disc. When a CD is not in
the unit, the LCD (16) will show N
O DISC
.
3. S
TOP/EJECT: Press STOP/EJECT (10) once to stop, twice
&/or hold to eject the CD.
4. C
UE: The CUE (9) button is used to store the exact moment
at which a track will begin playing. Use the CUE (9) button to
aid in program mixing. While the unit is in the play mode, & after
memorizing the cue point, pressing CUE
(9) will cause the CD play-
er to enter pause mode at the memorized cue point. Holding
down C
UE (9) changes the cue function to preview (allowing
you to hear the music play from the cue point). Releasing CUE (9)
returns you to the preset cue point in pause mode. If a cue point is
not memorized, pressing CUE (9) in play mode will not begin cue
selection.
5. P
LAY/PAUSE: Each press of the PLAY/PAUSE (8) causes the oper-
ation to change from play mode to pause mode or vice versa.
6. LCD: The L
IQUID CRYSTAL DISPLAY (LCD (16)) shows the track
numbers, play mode, pause mode, playback display, loops, tempo, &
pitch. The playback display shows 3 different time displays the time
elapsed, the total time remaining, & the track time remaining until
play ends. The playback display bar flashes slowly when the track has
30 seconds left. The playback display bar flashes quickly when the
track has 15 seconds left.
7. T
RACK SKIP +10: The TRACK SKIP +10 (15) rotary control
lets you select the track to play. Push T
RACK SKIP +10 (15) to
advance through the track list by increments of ten.
8. J
OG MODE: The JOG MODE (21) button is used to con-
vert the J
OG WHEEL
(22) from pitch bend to fast
forward/rewind. When deactivated movements of the JOG
W
HEEL
(22) will bend the pitch of a playing audio track for precise
beat adjustments when mixing. Press the JOG MODE (21) button &
then use the JOG WHEEL (22) to move forward or reverse while in
play mode. Use the JOG MODE (21) button in pause mode & the unit
will enter into stutter mode. Move the J
OG WHEEL (22) clockwise to
fast forward. Move the JOG WHEEL (22) counter clockwise to
rewind.
9. J
OG WHEEL: The JOG WHEEL (22) has multiple
functions:
Use the J
OG WHEEL (22) to bend the pitch for
precise synchronization in play mode during a mix.
The J
OG WHEEL (22) is also used for frame accu-
rate positioning in pause mode. This positioning on
the track may then be memorized as a point of CUE/RECALL (9).
You will notice that the unit will enter into stutter mode when mak-
ing your adjustments in pause mode. See the C
UE section for more
information.
In conjunction with the J
OG MODE (21) button, the JOG
WHEEL (22) is used for fast forward/rewind. See JOG MODE
4