


When the desired selection has reached the point at which you want
the sample to end press the same SAMPLE (18) button you have cho-
sen to save the sample again to end recording. The green SAMPLE (18)
LED will remain lit once you have ended the recording. The sample is
now stored and ready for play. You may press the SAMPLE (18) button
to layer the sample over any song. While the sample is playing, the
green SAMPLE (18) LED will blink.
To stop a sample from playing, press the SAMPLE (18) button again
while the sample is playing to cut it short. If you are not satisfied with the
recording of the sample or its location, simply press the MEMO (15) but-
ton. Then select a SAMPLE (18) button at the point which you would like
the sample to begin.
By selecting a SAMPLE (18) button that already has stored informa-
tion, you will instantly erase that information and rerecord over top of this
information.
CUE POINTS:
To use the CUE POINTS (16), you must first program the entry point.
Press the MEMO (15) button first to begin storing your CUE POINTS
(16). The MEMO (15) LED will illuminate to indicate that the unit is ready
for cue storage. Select a location to store your CUE POINT (16) by
choosing one of the 5 CUE POINTS (16) buttons.
When the track reaches the point at which you would like your cue to
begin, press the CUE POINT (16) button. The CUE POINT (16) LED will
blink when the cue selection has been stored. Press the CUE POINT
(16) button to start from that cue point at any moment during play and
the unit will automatically begin playing from that point. The CUE POINT
(16) LED will continue blinking during play to indicate that it is in use.
When the CUE POINT (16) is no longer in use, the CUE POINT (16)
LED will remain on to indicate that this cue point is still stored in that
location.
To rerecord a CUE POINT (16), repeat these instructions. By selecting
a CUE POINT (16) that already has stored information, you will instant-
ly erase that information and rerecord over top of this information.
CUE:
To use CUE (7) you must first find the point where you would like to
begin play. Place the track in PAUSE mode. This will activate the stutter
mode. Then use the JOG WHEEL (23) for fast, precise searching. SEE
JOG WHEEL (23) for more info.
Once you have found the point at which you would like to begin play-
ing, do not further adjust the JOG WHEEL (23). Then press
PLAY/PAUSE (8) rapidly. Then CUE (7) LED will blink. Your CUE is now
stored into the unit's memory.
Press CUE (7) to scan to the CUE point. This will pause the CD at the
point of cue. Press and hold the CUE (7) button to begin CUE preview,
which will allow you to judge whether the point of cue you have loaded
is satisfactory.
If you are not satisfied with your point of cue, press PAUSE (8) and use
the JOG WHEEL (23) to find the exact point you wish to begin play.
Rapidly press PLAY (8) twice to enter and exit play mode. You will be
in pause mode. The CUE (7) LED will blink. Repeat the steps for CUE
preview, to make sure your new cue point is satisfactory.
When you are satisfied with your point of cue, leave the CUE (7) button
alone, the CUE (7) LED will remain on to indicate that the point of cue
is stored and ready to be used. Press HOT START (17) for instant play
at your point of cue.
SEAMLESS LOOP:
Press the LOOP IN (40) button to enter an entry point into the memo-
ry, and the LOOP IN's (40) green LED will blink rapidly while memoriz-
ing the loop entry point into the memory.
After an entry loop point is memorized, press LOOP OUT (41) in play
mode to complete the loop. The unit will automatically repeat the sec-
tion between the loop's entry point, programmed with the pressing of the
LOOP IN (40) button, and a second exit loop point, when the LOOP
OUT (41) button is pressed. The loop is now programmed into the unit's
memory.
While playing the loop, both the LOOP IN (40) and LOOP OUT (41)
green LEDs will blink to indicate that the loop is in use. You will notice
the LCD (12) will also indicate that the LOOP is in use with a blinking
A1 icon that will remain steady once the loop has been stopped.
Press the RELOOP (42) for the unit to return to the previously set loop.
Press the RELOOP (42) repeatedly for stuttering the loop entry point.
The RELOOP (42) function automatically returns the music to the loop
point and will play the loop until it is released with the LOOP OUT (41)
button.
Press the B-EDIT (43) button to edit the loop created by your SEAM-
LESS LOOP. When pressing B-EDIT (43), the LCD(12) will read the
frame where the LOOP OUT (41) is set to. You may adjust it with the
use of the JOG WHEEL (23), by turning the wheel left or right examin-
ing frame by frame while the loop repeates itself. You should be able to
hear the difference in each frame until you are satisfied with your loop
exit point. Press B-EDIT (43) when you are satisfied with your exit point
and your loop will continue to play until you press LOOP OUT (41).
To exit the loop and resume play, press LOOP OUT (41) to stop the
loop and continue play from the point where the loop ends.
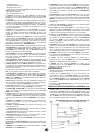
START
:
Turn the START (30) rotary control clockwise for a long, slow start.
Turn the START (30) rotary control counter clockwise for a short, fast
start. Make sure you activated the BRAKE (38) DSP button. The
BRAKE (38) LED will be illuminated when it has been activated. Then
from pause mode, press PLAY (8) to enter into play mode. You may
adjust this feature to the precise effect you wish by adjusting the START
(30) rotary control. The effect's parameter will be displayed at the bot-
tom of the LCD (12) listed BK START.
BRAKE:
Turn the BRAKE (31) rotary control clockwise for a long, slow stop.
Turn the BRAKE (31) rotary control counter clockwise for a short, fast
stop. Make sure you activated the BRAKE (38) DSP button. The
BRAKE (38) LED will be illuminated when it has been activated. Then
from play mode, press PAUSE (8) to enter into pause mode. You may
adjust this feature to the precise effect you wish by adjusting the
BRAKE (31) rotary control. The effect's parameter will be displayed at
the bottom of the LCD (12) listed BK STOP.
PROGRAM:
The MPX-30 has the capability to program a set list from the CD. This
will allow you to play selected tracks from the CD in the order you
choose. To program a set list, load the CD in to the DISC IN SLOT (10).
After the unit reads the CD, play should be stopped. Then press the
PGM button in the DIRECT SELECT (14) section of your unit to begin
programming your set list.
Select the first track with which you would like to start the set list with
the DIRECT SELECT (14) buttons or the FOLDER/TRACK SKIP (13)
rotary control. Once you have selected a track, press SET in the
DIRECT SELECT (14) section of your unit to store this track into your
program list. Repeat these steps until you have completed your set list.
If you would like to change a track in your set list, press PGM repeat-
edly until you have reached the track you wish to change. Use the
DIRECT SELECT (14) buttons or the FOLDER/TRACK SKIP (13)
rotary control to enter the track you wish to save to the set list. Then
press SET and you will have stored the track into the set list. Press
PLAY (8) to begin the set, and your set list will be completed.
You may scroll through this list, after pressing PLAY (8), with the
FOLDER/TRACK SKIP (13) rotary control to make sure that the set is
in the order that you wish.
TROUBLESHOOTING:
· If the disk will not play, check to see if the disc was loaded correctly
(label side up). Also check the disc for excessive dirt, scratches, etc.
· If the disc turns but there is no sound, check the cable connections. If
they are okay, check your amplifier or receiver.
· If the CD skips, check the CD for dirt or scratches. Do not assume that
the CD player is defective. Many CDs are recorded out of spec and will
skip on most or all CD players. Before sending the unit in for repair, try
playing a CD that you are sure plays properly.
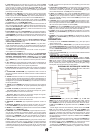
SPECIFICATIONS:
GENERAL:
Type................................................Single Mechanism Compact Disc Player
Disc Type............................................Standard Compact discs (12cm, 8cm)
Time Display.........................Track Elapsed, Track Remain, or Total Remain
Variable Pitch..........± 4%, ± 8%, ± 16%, + 100% Slider with Resume Switch
Pitch Bend.............................................................................± 4% Maximum
Instant Start..................................................................Within 0.015 seconds
Track Selection......................................................................1 to 999 Tracks
AUDIO SECTION:
Quantization..........................................1 Bit Linear/Channel, 3 Beam Laser
Bit Rate.....................................................................................32-320KBPS
Oversampling Rate............................................................................8 Times
Sampling Frequency........................................................................44.1 kHz
Frequency Response............................................................20 Hz to 20 kHz
Total Harmonic Distortion...................................................Less Than 0.05%
Signal to Noise Ratio..........................................................................90 dB
Dynamic Range.................................................................................< 80 dB
Channel Separation..................................................................88 dB (1 kHz)
Output Level.........................................................................1.3 Volts R.M.S.
Power Supply............................................................AC 115/230V, 60/50 Hz
Dimensions...................................................8 1/2" W x 3 3/4" H x 12 1/2" D
.....................................................................................(216 x 95 x 320 mm)
Weight...................................................................Player Unit 6.62 lbs (3 kg)
NOTE: SPECIFICATIONS AND DESIGN ARE SUBJECT TO CHANGE WITHOUT NOTICE FOR
PURPOSE OF IMPROVEMENT.
(6)