


- TIME REMAINING on the track.
For MP3(s) the TIME (25) button switches the time display between the
2 available choices listed under LCD(12):
- MP3 ELAPSED
- MP3 REMAINING
14. LOOP IN: Pressing the LOOP IN (40) button while a track is playing
will enter a loop point into the memory, and the LOOP IN's green LED
will blink rapidly while memorizing the loop entry point. This is the first
step in creating a SEAMLESS LOOP.
15. LOOP OUT: After a loop entry point is memorized, pressing LOOP
OUT (41) in play mode will complete the loop with an exit point. This will
repeat the section between the loop's entry point, programmed with the
pressing of the LOOP IN (40) button, and a second exit loop point, when
the LOOP OUT (41) button is pressed. Press LOOP OUT (41) again to
stop the loop from repeating and continue play from the point where the
loop ends.
16. RELOOP: Press the RELOOP (42) for the unit to return to the previ-
ously set loop. Press the RELOOP (42) repeatedly for stuttering the loop
entry point. The RELOOP (42) function automatically returns the music
to the loop point and will play the loop until it is released with the LOOP
OUT (41) button.
17. B-EDIT: Use the B-EDIT (43) button to edit the SEAMLESS LOOP.
This feature allows you to adjust the exit point saved in your LOOP OUT
(41) setting. (See Seamless Loop).
18. PITCH: Pressing the PITCH (19) buttons enable you to select pitch
levels ranging from 4%, 8%, 16%, & 100%. Press the 2 buttons labeled
PITCH OFF (4% & 16%) together to turn OFF the PITCH CONTROL
SLIDE (21). Press all 3 buttons to select the 100% pitch setting.
19. PITCH BEND:
Pushing the PITCH BEND (20) buttons will automati-
cally raise the pitch up to +4% or lower the pitch down to -4% from the
existing pitch setting. Releasing the PITCH BEND (20) buttons will
return the pitch to the original pitch setting. You can use the PITCH
BEND (20) to match beats when mixing from one song to another.
20. PITCH CONTROL SLIDE: Moving the PITCH CONTROL SLIDE (21)
up or down will lower or raise the pitch percentage up to the selected
PITCH (19) setting.
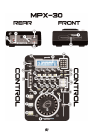
21. DIRECT SELECT: Use the DIRECT SELECT (14) section to access
a track directly without scrolling through to find it or to create a pro-
grammed set list (see PROGRAM).
With CD(s) you may key in the specific track you would like to play, in
order to instantly scan through the track list to the selected track.
With MP3 you may key in the specific track you would like to play, by
keying in the track number & then press SET in order to instantly scan
through the track list to the selected track.
22. DSP EFFECTS: The MPX-30 comes equipped with 8 Digital Signal
Processor (DSP) Effects. FILTER, ZOOM, ECHO, PAN, REVERSE,
TRANSFORM, BRAKE and SCRATCH, are all DSP effects that can be
futher modified by the DRY/WET (28), START (30), and BRAKE (31)
rotary control knobs. See respective functions for more information:
23. ECHO: ECHO (34) is when the original signal is delayed when being
input and then fed back into the signal creating the Echo effect. The
length of the echo increases or decreases when increasing or decreas-
ing the parameter setting.
24. PAN: PAN (35) simply pans the sound from the left and to the right. It
will speed up or slow down as you increase or decrease the parameter
setting.
25. TRANSFORM: TRANSFORM (37) simply cuts the sound from the left
and right stereo levels. It will speed up or slow down as you increase or
decrease the parameter setting.
26. ZOOM: Mixing the signal with a slightly delayed copy of itself, where
the length of the delay is constantly changed, creates ZOOMING. This
resembles the sound of a plane taking off and landing. The depth of the
ZOOM (33) will increase or decrease with the parameter modification.
27. BRAKE: The BRAKE (38) button simulates the sound of a record
stopping/starting on a turntable. The higher or lower the parameter the
longer or shorter it takes for the record to stop.
28. FILTER: The FILTER (32) goes through three passes during parame-
ter adjustment:
- Low Pass filters out the other frequencies except the low frequency.
With a lower parameter you will hear it more.
- High Pass filters out the other frequencies except the high frequency.
With a higher parameter you will hear it more.
- Band Pass filters out the other frequencies except the mid-range fre-
quency. With the parameter setting in the middle you will hear it more.
29. REVERSE: The REVERSE (36) button simply plays the track in
REVERSE.
30. SCRATCH: SCRATCH (39) will simulate scratching with a record on
a turntable. Use the JOG WHEEL (23) with this feature to create precise
cuts and scratches.
31. MEMO: The MEMO (15) button allows you to begin storing your CUE
POINT(S) (16) and SAMPLE(S) (18).
(5)
32. SAMPLER: Use the SAMPLE (18) button(s) to play a section of a
track, stored in sample memory, over the track playing to provide an
extra layer to your mix. You may store 4 samples in the SAMPLE (18)
button(s). Once a sample is stored the respective LED will remain lit
indicating that the sample is ready to be used at the press of the but-
ton(s).
33. CUE POINTS: There are 5 CUE POINT(S) (16) that may be created
on the fly. You may create an entry point in a track from which you will
begin play instantly. By pressing the CUE POINT(S) (16) you may jump
to different sections of a song or a CD without any breaks. This feature
helps you eliminate pauses involved in track search and/or play various
points of a song to shorten or enhance a mix.
34. CUE: The CUE (7) button is used to store the exact moment at which
a track will begin playing. Use the CUE (7) button to aid in program mix-
ing.
35. HOT START: The HOT START (17) button is used for instant play at
the master CUE (7) point. Once a CUE (7) point has been stored and
set to play, press HOT START (17) for instant play. SEE CUE instruc-
tion for more info.
36. BPM: Use the BPM (27) button to count the beats per minute on a
track. This feature will allow you to beat match faster and easier. Press
the BPM (27) button once to activate the BPM (27); the LCD (12) will
show the BPM icon and tempo info. Press the button again to deactivate
the BPM (27), the LCD (12) will hide the BPM icon and not show the
tempo info.
37. DRY/WET: Use the DRY/WET (28) rotary control to adjust the volume
of the effects entered into the program output via the DSP effects but-
tons. Turn the rotary control clockwise for WET effects. The WET effect
occurs when the music is drowned out with effects. Turn the rotary con-
trol counterclockwise for DRY effects, a lower volume for effects. The
DRY effect occurs when the music will be heard clearly over the effect.
38. DIMMER: Use the DIMMER (29) rotary control to adjust the brightness
of the LCD (12). Turn the rotary control clockwise to brighten the LCD
(12). Turn the rotary control counterclockwise to
dim the LCD (12).
39. START: Use the START (30) rotary control in conjunction with the
BRAKE (38) button and PLAY/PAUSE (8) button to adjust the delay
time in starting a track.
40. BRAKE: Use the BRAKE (31) rotary control in conjunction with the
BRAKE (38) button and PLAY/PAUSE (8) button to adjust the delay
time in stopping a track.
OPERATIONS:
1. Place a MP3/CD in the DISC IN SLOT (10) and push it in so the unit
accepts the MP3/CD. The disc will enter into the unit and begin to read.
2. Adjust the FOLDER/TRACK SKIP(13) rotary control or press the track
number in the DIRECT SELECT (14) section to select the track you
want to play for regular CD(s). For MP3 CD(s), key in the DIRECT
SELECT (14) could be used to find the track or push the
FOLDER/TRACK SKIP (13) rotary control or to find the folder and turn
the control to find the track inside the folder.
3. Press the PLAY/PAUSE (8) button and the unit will instantly play.
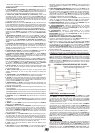
ORDER OF READING FOR MP3 FILES:
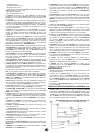
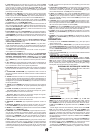
All MP3 files must have the extension *.mp3 or .mpeg2. (See w.wna
and r.jpg files in the diagram).MPX-30 supports ISO 9660 standard,
which means it will read files in subdirectories down to 8th level. CBR &
VBR formats are supported. The MPX-30 reads the Root folder files first,
then main folder files second, then sub folder files, all other files will not
be read.
SAMPLES:
To store a sample, first you must press the MEMO (15) button, the blue
MEMO (15) LED will be lit indicating that the unit is ready for sample
storage. When the track has reached the desired point at which you
would like the sample to begin, select a SAMPLE (18) button where you
would like the sample to be stored. Press the button. The green
SAMPLE (18) LED will blink indicating that the MEMO (15) is actively
recording the sample.
FILE FOLDER SAMPLE DIAGRAM
(2) F.MP3
W.WNA
(1) A.MP3
(3) B.MP3
(8) G.MP3
(6) H.MP3
(5) E.MP3
R.JPG
(7) D.MP3
(4) C.MP3
ORDER OF READING FOR MP3 FILES: A.MP3, F.MP3,
B.MP3, C.MP3, E.MP3, H.MP3, D.MP3, G.MP3.