


E10 OPERATION MANUAL
1514
WORKING WITH MEMORY continued
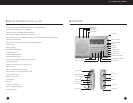
ACCESSING WHAT IS STORED
INTO MEMORY
There are three ways to access what has been
stored into memory: Direct Memory Access, Manual
Memory Search and Memory Auto-scan.These
three methods are described below.When the
memory page and memory preset numbers appear
in the upper right corner of the display, as it will in
the descriptions below, the radio is in MEMORY
ACCESS MODE.This mode can be exited any time
with a press/release of the SCAN MODE button (12).
If you first need to change memory pages, see the
previous section, SELECTING/CHANGING MEMORY
PAGES.
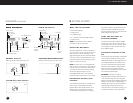
DIRECT MEMORY ACCESS
Use the numeric keypad to key-in the memory
number. For example, if the desired radio station is
in memory number 01, just press ‘0’, then ‘1’, and
it will go to memory 01.
MANUAL MEMORY SEARCH
Manual Memory Search enables manual searching
through the memories within a memory page, as
shown below:
1. Press/release the SCAN MODE (12) button.
2. Use quick,short presses on the Up/Hour-
Down/Min. buttons or use the tuning knob to
search through the memories.
3. Press the SCAN MODE button when finished.
MEMORY AUTO-SCAN
Memory Auto-scan enables scanning through the
memories within the selected memory page. Each
filled memory is accessed for about 5 seconds, after
which the scan move on to the next used memory
automatically, staying on it for about 5 seconds.
This continues indefinitely on the selected page
until deliberately stopped. Unused memories are
not accessed.
1. Press/release SCAN MODE (12) button.
2. Press/hold either the Up/Hour or Down/Min.
button for about a second.Then release it. Note
that PRESET flashes under the memory number,
indicating that memory scanning is functioning
with each memory being scanned for about 4
seconds. It then moves on to the next memory
for another 4 seconds.
To stop memory preset auto-scan, press/release
either the Up/Hour or Down/Min. button.
DELETING A MEMORY’S
CONTENTS
1. Press/release the SCAN MODE button (12).
2. Use the Up/Hour or Down/Min.button (5,6) to
select the memory preset location of the fre-
quency that you wish to delete.Alternately, use
the numeric keypad to enter the memory number.
3. Press/hold the MEMORY button (18) for about 2
seconds and then release it.‘dEL’ appears flashing
in the display.
4. While ‘del’ is still flashing, press/release the
MEMORY button.
CLOCK AND TIMER FEATURES continued
At the factory, the E10 is set up with 10 pages of
memory, each page holding 50 frequencies.This
enables storing of 500 frequencies into memory.
This factory setting can be changed and tailored to
your personal needs or can be left as-is.When first
learning to store stations into memory, we suggest
using the factory setting.To change the factory
setting, see the section CUSTOMIZING MEMORY
PAGES. When working with memory, the term
PRESET appears in the display under the memory
numbers.
STORING STATIONS INTO
MEMORY
1. Turn on the radio.
2. Tune to the desired station.
3. Press/release the MEMORY button (18). Note
that the memory number digits, labeled PRESET
(48) flash in the upper right corner of the dis-
play.The memory page number, labeled PAGE,
also appears, but does not flash.
4. Within 5 seconds use the numeric keypad to
enter the memory number that you wish to
store the station into. For memories 1-9, enter
the numbers as 01 – 09.
5. Within 5 seconds press the MEMORY button, or
wait 5 seconds.This finalizes storing into memory
and after a few seconds, the upper right corner’s
display returns to showing the clock.
SELECTING/CHANGING
MEMORY PAGES
To select/change memory pages:
1. Press/release the PAGE button (11).The page
number flashes in the display.
2. Within three seconds, use either the UP/HOUR-
DOWN/MIN button to change to the page of
your choice. Alternately, use the numeric keypad
to enter the page.
3. Press/release the PAGE button to finalize the
page change.
8 WORKING WITH MEMORY
ACTIVATING/DEACTIVATING
THE TIMER
For a timer to turn on the radio, it must be activated.
A timer can be activated/deactivated with the radio
on or off. To activate the timer, press/release the
TIMER A or TIMER B button. The timer symbol will
appear in the display.To deactivate a timer,
press/release the TIMER A or TIMER B button.The
timer symbol will disappear from the display.
USING THE SNOOZE FEATURE
When the timer activates and turns the radio on,
the timer activation symbol (39) appears flashing in
the display.While it is flashing, press/release the
SNOOZE/LIGHT button (7).The radio will turn off
and then turn on again in 10 minutes.This process
can be repeated 3 times.