


E10 OPERATION MANUAL
98
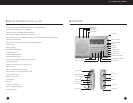
6 BASIC RADIO OPERATION
TURNING THE E10 ON AND OFF
The E10 can be turned on by the two methods
shown below. To turn it off, press the
POWER/SLEEP button (1).
1. BATTERY SAVER/TIMER METHOD:
Perform a quick, short press of the POWER/SLEEP
button (1). This turns the radio on with 90 in the
display and causes the radio to shut off automatically
after 90 minutes. The sleep timer symbol, , also
appears in the display. To change the automatic
shut off time from 90 minutes to the number of
minutes-to-play of your preference, use the Up/Hour
or Down/Min. buttons (9, 10) immediately after
turning on the radio.This allows selection of 1 – 480
minutes of playtime before automatic shut-off
occurs. The number of minutes that you last set are
also used the next time the radio is turned on.
2. TIMER-DEFEAT METHOD:
This method defeats the automatic minute timer
and causes the radio to stay on until deliberately
turned off, until the batteries drain or indefinitely if
used with an AC adaptor. Hold down the POWER
button for about 3 seconds, then release. Note that
‘On’ appears in the display and that he sleep timer
symbol does not appear when this method is used.
SIGNAL STRENGTH AND
BATTERY STRENGTH INDICATOR
When the radio is turned off, the upper left corner
of the display (6) shows battery strength on the
1–5 scale (36), with the triangle pointer (33) under
the battery symbol (34) on the far left side of the
scale. When the radio is turned on, the pointer is
under the antenna symbol (35) and the 1-5 scale
shows relative signal strength.
VOLUME AND TONE CONTROLS
• The volume control (31), labeled VOLUME, is
located on the right side of the radio.To change the
volume, rotate the volume control knob.
• The tone control (24), on the left side of the radio
is labeled TREBLE/BASS. Use the position producing
the sound that you like best.
USING EARPHONES
Earphones/headphones with a 1/8 inch stereo plug
can be used. Plug them into the earphone socket
(25) on the left side of the radio.
SELECTING FM, AM OR
SHORTWAVE
When listening to FM or shortwave, fully extend the
telescopic antenna (5). It need not be extended
when listening to AM stations. After turning on the
E10, perform quick, short presses of the ‘FM/AM-ATS’
button (15) to select FM or AM. Note that when the
AM band is selected, the display shows MW, not AM.
To select SW press the ‘SW METER BAND’
button (16). Each sequential press of the SW METER
BAND button or of the UP/HOUR or DOWN/MIN
buttons places the radio at the beginning of a specific
shortwave meter band.The frequency digits (46)
appear toward the center portion of the display.The
local stations of the area that you are currently in
will be heard on AM and FM, while shortwave
stations from around the world can be heard on SW.
NOTE: If you are new to shortwave, see the special
shortwave sections later in this manual.
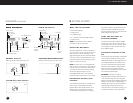
GETTING STARTED continued
The included AC Adaptor/Charger may be used to
charge 4 Ni-MH rechargeable batteries (included)
when installed onto the E10’s battery compart-
ment. Before charging, the E10 must be set up for
use with Ni-MH batteries and the correct charging
rate must be selected for them to be charged. Ni-MH
batteries are manufactured with specific capacities
rated in milliamp-hours (mAh).These capacities vary
from about 1100 mAh up to 2400 mAh at the time
of this writing (usually printed on the batteries). For
proper charging without damage to the batteries, the
correct charging rate must be set.To set the
charging rate, plug in the AC adaptor and turn the
E10 off. Then follow the instructions below.
1. Enter SYSTEM SET CODE 28. See instructions in
the section titled SYSTEM SET CODES.
2. While ‘1100’ flashes in the display, use the UP
HOUR/DOWN MIN buttons to select the mAh
rating of your Ni-MH batteries.
To charge Ni-MH batteries:
1. Install 4 Ni-MH AA batteries.
2. Connect the adaptor/charger to the AC wall
3. Press/release the CHARGER ON/OFF button.
‘CHARGE’ will flash in the display and the
charge indication bars will advance from left to
right on the 0 – 5 scale in the upper left corner
of the display.The digits in the upper right corner
of the display will change to 00:00 and will
count up in minutes and hours until charging
is finished.
Once charging is finished, ‘CHARGE’ will stop
flashing and the charging indicator bars in the
upper left corner will stay on 5.
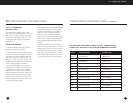
Charging time varies depending on the milliamp-
hour rating of the batteries.The charging circuit
automatically senses the milliamp-hour rating of
the batteries and will charge them for the correct
amount of time. Charging time can take from 6 hours
for 1100 mAh batteries to 13 hours for 2300 mAh
batteries. The charging circuit will sense when the
batteries are fully charged and automatically
go into trickle-charge mode, thus safeguarding the
batteries from being overcharged. Disconnecting
the adaptor/charger ACG-10 from the E10 or
pressing the CHARGER ON/OFF button will also
stop charging.