


7
© 2003 Directed Electronics, Inc
TWEETER INSTALLATION
Review the
Installation Precautions
section of this guide before proceeding.
Flush Mounting into
Removed Panels
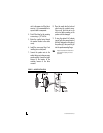
1. Disassemble the underside of the
woofer mounting flange by removing
the four screws from the bottom side
of the tweeter bridge. Twist the top
of the tweeter to remove the grill and
gain access to the tweeter. Pull the
tweeter out with the wires attached.
2. Determine the tweeter mounting
location, then route the wires from
the crossover to the tweeter location.
3. Mark the center point of the tweeter.
4. If using a hole saw, first drill a pilot
hole, then cut out the hole using a
standard 2-1/8" hole saw.
5. If not using a hole saw, use the
surface mount trim ring as a
template to mark the proper size
hole. Cut out the hole.
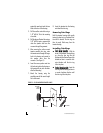
6. With the tweeter assembled, route
the wires through the hole and the
pressure ring and slip the pressure
ring over the tweeter assembly.
7. Align the tweeter so the Directed logo
faces the desired direction then push
the pressure ring on to the rear of the
tweeter assembly until the tweeter is
snugly mounted to the panel.
8. Connect the speaker wires observing
the correct polarity and re-assemble
the panel.
Flush Mounting into
Mounted Panels
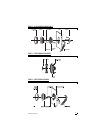
1. Remove the tweeter from the flush
mount housing and insert the
proper length machine bolt through
the center hole of the flush mount
housing and connect to the spring
steel X-bracket. (See Figure 3.)
2. Connect the speaker wires
observing the correct polarity.
3. Press the X-bracket portion of the
assembly through the hole until its
legs spring open.
4. Screw the bolt in until the tweeter
housing is firmly mounted to the
panel. (Make sure the arrow at the
rear of the tweeter housing is
pointing in the desired direction.)
5. Insert the tweeter into the housing
and attach trim ring. (Refer to the
trim ring information at the end of
this section.)
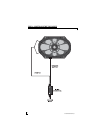
Tweeter Surface Mounting
1. With the tweeter removed from the
bridge, determine the tweeter
mounting location, then route the
wires from the crossover to the
tweeter location.
2. Place the surface mount housing