


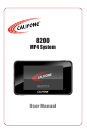

califone.com
6
califone.com
7
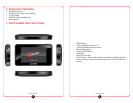
4. SETUP AND INSTALLATION
4.1 RECHARGING
1. Before use, for best performance be sure to recharge the 8200
using the USB connection to a PC.
2. Turn on the PC and connect the 8200 to one of the PC’s USB
jacks using the included cable.
3. The 8200 will immediately begin charging. An indicator on the
screen will show the charging status.
4. While in use, the battery level indicator in the upper right of the
LCD screen indicates how much battery power is available.
When the indicator is low, the battery should be recharged.
NOTES:
• The 8200 may be operated while recharging using the wall
power adapter.
• The 8200 cannot be operated while recharging using a PC.
4.2 POWER ON AND OFF
1. First, remove the plastic LCD screen protector.
2. To turn on the 8200 power, switch the power switch to the on
position. The LCD will then show the startup screen followed by
the main menu.
3. To turn off the 8200 power, switch the power switch to the off
position. The LCD will then show the shutdown screen and then
go black.
4.3 SETTING THE DATE/TIME
1. To set the date/time, go to Settings -> System settings -> Set
Date/Time.
2. Then set the time zone and Date/Time as appropriate.
4.4 COPYING MEDIA FILES TO THE 8200
3. Plug the 8200 into a PC using the included USB cord.
4. The PC will automatically recognize the device and the internal
ash memory will be listed as a removable external drive.
5. If an SD card is installed, it will also show up as a removable
external drive on the PC.
6. Note the 8200 content directories are as follows: EBOOKS,
GAMES, IMAGES, MOVIES, MUSIC.
7. Copy media les such as music (mp3) and movies (avi, mpg,
etc.) into the appropriate directory in the 8200 memory.
4.5 CONNECTING HEADPHONES
1. Connect the included 8200-HP headphone to one of the
headphone jacks on the side of the 8200.
2. Adjust the volume to the desired level in the Music or Movie
mode by playing music or a movie le and using the D-Pad Up
and Down to increase or decrease the volume level.
3. By default, the 85 dB limiter is enabled and set for the included
8200-HP headphones. To disable or change the 85 dB SPL
limiter setting, go to Settings -> System settings -> Audio Limiter.
Then select the desired preset. By default, Preset 1 is enabled
and set for the 8200-HP headphone included with the 8200.
Preset 2 is set for use with the 3065AV headset and Preset 3
turns off the limiter. To use the limiter function with other Califone
headphones, contact Califone Technical Support.
CAUTION: Avoid excessive volume for long periods of time as
this can result in hearing damage.
CAUTION: The 85 dB SPL Limiter will only work with
headphones/headsets specically sold by Califone for use with
the 8200. Check with Califone to see if your headphone/headset
is compatible with this feature.
5. BASIC OPERATION
5.1 MAIN MENU
Use the touchscreen to operate the 8200. Press the MENU button to
return to a previous menu.