


18
Steps to Installing
Testing the space behind the hole
You need a tape measure and a sturdy wire (such as a straightened coat hanger)
22 inches (55.9 cm) in length for this step.
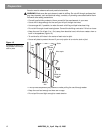
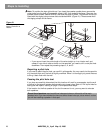
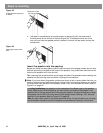
1. Bend the wire as shown in Figure 17.
Figure 17
A 22-inch (55.9 cm) length
of sturdy wire bent in two
places
Tip: For greater accuracy, make the first bend a little long, measure again, and cut off the
extra length at that end.
WARNING: If there is a possibility of electrical wiring in the space behind the wallboard, wrap
the wire with electrical tape to prevent electric shock.
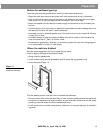
2. Make a mark 4
1
/
8
inches (10.5 cm) from the short end as an indicator of the proper front-
to-back depth of the hole.
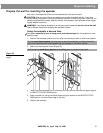
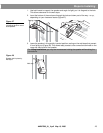
3. Use the bent wire to test for enough depth, front-to-back:
Insert the short end of the wire into the hole and straight back (Figure 18). Probe to make
sure nothing impedes inserting this end to a depth of 4
1
/
8
inches (10.5 cm). This indicates
that the space behind the wallboard is deep enough for the front-to-back speaker
dimension.
Figure 18
Checking the space for the
depth of the speaker
• If the wire goes in without a problem, proceed to step 4, below.
• If you cannot insert the wire to the 4
1
/
8
-inch (10.5 cm) mark, you need to drill a new pilot
hole elsewhere. Then repeat step 3.
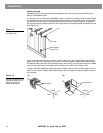
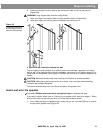
4. Use the wire again to test the width, side-to-side:
With the short end still in the hole, reposition it (as shown in Figure 19) and rotate it 360˚
around the hole. This indicates if the wall space is wide enough on each side of the hole
for the side-to-side dimension of the speaker.
14
1
/
4
inches
(36.2 cm)
4
3
/
4
inches
(12 cm)
3 inches (7.6 cm)
4
1
/
8
inches
(10.5 cm)
4
1
/
8
"
(10.5 cm)
4
1
/
8
"
(10.5 cm)
AM267565_01_V.pdf May 13, 2003