


10
Preparation
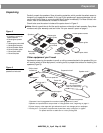
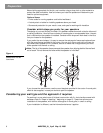
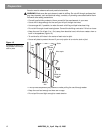
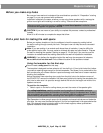
• Each speaker enclosure extends
into the wall or ceiling
, as shown in the gray DO NOT CUT
area on the template (Figure 7), and below the grille. The speaker enclosure can be inserted
either up or down.
Note:
In cold climates where a humidifier is used, avoid inserting the speaker upside-down
in an exterior wall to prevent problems with condensation.
Allowing enough room both above and below the hole you draw provides a fallback in case
the area below your pilot hole is not suitable for the speaker enclosure.
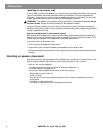
Figure 7
Template for either
rectangular-faced (left)
or round-faced (right)
speakers
CAUTION:
When installed, the speaker enclosure cannot be seen behind the wall or ceiling.
Do not attempt to nail, cut, or drill on that surface area. Puncturing the speaker enclosure with
a tool will seriously damage the speaker.
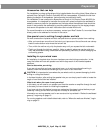
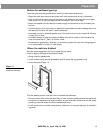
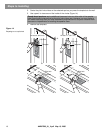
• All electrical wiring, vents, and plumbing pipes located inside the walls must be avoided
(Figure 8). Check with a trained professional if you need instructions on how to locate and
avoid them.
Figure 8
Cautions against unseen
danger, such as (a) electri-
cal wires or (b) plumbing
pipes, behind the wallboard
• Use of a stud finder can help ensure that the speaker hole is at least 4
3
/
4
" (12 cm) from a
stud or joist.
• The selected location should be at the height you want for both speakers and where you
can maintain the minimum distance of 5 feet (1.5 m) between them.
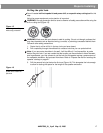
Keeping in mind the guidelines given:
1. Decide where the first speaker will go.
2. Select the location for the second speaker.
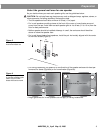
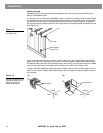
3. Use the provided template for drawing both a pilot hole and the speaker-face outline.
5
1
/
2
" (14 cm)
DO NOT
CUT AROUND
GRAY AREA
8
1
/
16
" (20.5 cm)
14
1
/
2
" (36.9 cm)
TAPE
HERE
TAPE
HERE
TAP E
HERE
WHITE CUT OUT AREA
WHITE CUT OUT AREA
Pilot Hole
WARNING: Make sure the spot chosen is safe for cutting. Do not cut through
surfaces that have hazards, such as electrical wiring, conduits or plumbing,
concealed behind them. If you are not sure, consult a professional installer
before you proceed.
DO NOT
CUT AROUND
GRAY AREA
DO NOT
CUT AROUND
GRAY AREA
DO NOT
CUT AROUND
GRAY AREA
DO NOT
CUT AROUND
GRAY AREA
DO NOT
CUT AROUND
GRAY AREA
DO NOT
CUT AROUND
GRAY AREA
DO NOT
CUT AROUND
GRAY AREA
English & Translations
WARNING: Make sure the spot chosen is safe for cutting. Do not cut through surfaces that have hazards, such as electrical
wiring, conduits or plumbing, concealed behind them. If you are not sure, consult a professional installer before you proceed.
WARNING: Make sure the spot chosen is safe for
drilling. Do not cut through surfaces that have hazards
concealed behind them, such as electrical wiring,
conduits or plumbing. If you are not sure, consult a
professional installer before you proceed.
WARNING: Make sure the spot chosen is safe for
drilling. Do not cut through surfaces that have hazards
concealed behind them, such as electrical wiring,
conduits or plumbing. If you are not sure, consult a
professional installer before you proceed.
WARNING: Make sure the
spot chosen is safe for
drilling. Do not cut through
surfaces that have hazards
concealed behind them,
such as electrical wiring,
conduits or plumbing. If you
are not sure, consult a
professional installer before
you proceed.
WARNING: Make
sure the spot chosen
is safe for drilling. Do
not cut through
surfaces that have
hazards concealed
behind them, such
as electrical wiring,
conduits or
plumbing. If you are
not sure, consult a
professional installer
before you proceed.
WARNING: Make sure the spot chosen is safe
for drilling. Do not cut through surfaces that have
hazards concealed behind them, such as
electrical wiring, conduits or plumbing. If you
are not sure, consult a professional installer
before you proceed.
WARNING: Make sure the spot
chosen is safe for drilling. Do not cut
through surfaces that have hazards
concealed behind them, such as
electrical wiring, conduits or plumbing.
If you are not sure, consult a
professional installer before you
proceed.
9" (22.9 cm)
TAP E
HERE
Translations below
TAP E
HERE
TAP E
HERE
TAPE
HERE
WHITE CUT OUT AREA
WHITE CUT OUT AREA
Pilot Hole
WARNING: Make sure the spot chosen is safe for cutting.
Do not cut through surfaces that have hazards, such as
electrical wiring, conduits or plumbing, concealed behind
them. If you are not sure, consult a professional installer
before you proceed.
DO NOT
CUT AROUND
GRAY AREA
WARNING: Make sure the spot chosen is safe for cutting. Do not cut through surfaces that have hazards, such as electrical
wiring, conduits or plumbing, concealed behind them. If you are not sure, consult a professional installer before you proceed.
WARNING: Make sure the spot chosen is safe for
drilling. Do not cut through surfaces that have hazards
concealed behind them, such as electrical wiring,
conduits or plumbing. If you are not sure, consult a
professional installer before you proceed.
WARNING: Make sure the spot chosen is safe for
drilling. Do not cut through surfaces that have hazards
concealed behind them, such as electrical wiring,
conduits or plumbing. If you are not sure, consult a
professional installer before you proceed.
WARNING: Make sure the spot
chosen is safe for drilling. Do not cut
through surfaces that have hazards
concealed behind them, such as
electrical wiring, conduits or plumbing.
If you are not sure, consult a
professional installer before you
proceed.
TAPE
HERE
Translations below
TAPE
HERE
English & Translations
TAPE
HERE
WARNING: Make
sure the spot chosen
is safe for drilling. Do
not cut through
surfaces that have
hazards concealed
behind them, such
as electrical wiring,
conduits or
plumbing. If you are
not sure, consult a
professional installer
before you proceed.
WARNING: Make
sure the spot chosen
is safe for drilling. Do
not cut through
surfaces that have
hazards concealed
behind them, such
as electrical wiring,
conduits or
plumbing. If you are
not sure, consult a
professional installer
before you proceed.
WARNING: Make sure the spot
chosen is safe for drilling. Do not cut
through surfaces that have hazards
concealed behind them, such as
electrical wiring, conduits or plumbing.
If you are not sure, consult a
professional installer before you
proceed.
TAPE
HERE
T
A
P
E
H
E
R
E
DO NOT
CUT AROUND
GRAY AREA
DO NOT
CUT AROUND
GRAY AREA
DO NOT
CUT AROUND
GRAY AREA
DO NOT
CUT AROUND
GRAY AREA
DO NOT
CUT AROUND
GRAY AREA
DO NOT
CUT AROUND
GRAY AREA
DO NOT
CUT AROUND
GRAY AREA
NOT FOR CUTTING
Large gray area
represents space to
reserve behind the wall
for the speaker
enclosure.
On the template at right,
small gray tabs also
indicate where not to cut.
FOR CUTTING
Large white area
represents what to cut
out for the speaker face.
On the template at right,
small circles outside the
white area indicate
additional holes needed
for the round-faced
speaker only.
(a)
(b)
AM267565_01_V.pdf May 13, 2003