


34
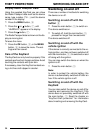
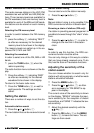
➮ Push the KeyCard with the carriage in
the direction of the arrow (2) carefully as
far as the stop.
➮ Close the control unit (arrow 3).
Note:
If the wrong kind of card, such as a cashpoint
card, is inserted into the device, “Wrong KC”
will appear on the display. Remove the incor-
rect card, and insert a KeyCard that is known
to the device.
Removing the KeyCard
In order to unlock the control unit
➮ press the button, 1.
The control unit opens.
➮ Push the card with the “carriage” to the
right as far as the stop.
➮ Remove the card from the control unit.
➮ Close the control unit.
Note:
In order to prevent theft, remove the KeyCard
whenever you leave the vehicle, and leave the
control unit opened.
For reasons of safety the control unit
must always be closed when the vehicle is
moving.
“Training” a second KeyCard /
Replacing the KeyCard
A second KeyCard can be “trained” as a sub-
stitute if the device is operating with the first
KeyCard.
If you want to “train” a second KeyCard
➮ insert the first KeyCard and switch the
device on.
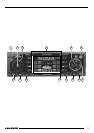
➮ Press the MENU button, 8.
KeyCard theft protection
A KeyCard is included with your car radio.
The radio can also be operated with a sec-
ond KeyCard.
If one KeyCard becomes lost or damaged you
can obtain a replacement through your Blau-
punkt dealer.
If you use two KeyCards, the settings of the
first KeyCard are adopted by the first Key-
Card. You can, however, store the following
functions separately:
station button allocation, bass, treble, balance
and fader settings, loudness, traffic an-
nouncement volume, beep volume and equal-
izer adjustment.
In addition to this, the last values selected for
the waveband, station setting, traffic an-
nouncements, RDS, REG, scan time, search
sensitivity, initial volume and SHARX are
stored.
This means that the basic settings you have
selected are made as soon as the KeyCard
is inserted.
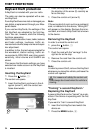
Inserting the KeyCard
➮ Press the button, 1.
The control unit opens.
➮ Insert the KeyCard, as shown in the di-
agram (arrow 1), with the contact sur-
faces downwards.
2
1
3
THEFT PROTECTION