


724-746-5500 | blackbox.com
Page 12
Chapter 3: Configuration and Setup
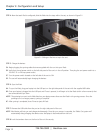
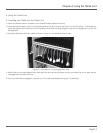
STEP 4: Now that each iPad is configured, slide the iPads into the trays within the cart, as shown in Figure 3-1.
Figure 3-1. Sliding an iPad into a tray in the cart.
STEP 5: Charge the devices.
5A. Begin plugging the syncing cables that were supplied with the cart into your iPads.
5B. Verify that the red power switch on the left side panel of the cart is in the off position. Then plug the cart power cord into a
120-VAC 15- or 20-amp power outlet.
5C. Turn the power switch located on the left side of the cart to ON.
5D. The cart will automatically begin charging the devices.
STEP 6: Sync the iPads.
6A. To sync the iPads, plug your laptop into the USB port on the right side panel of the cart with the supplied USB cable.
6B. Once your laptop is plugged into the USB port and iTunes is opened, it will begin to list the iPads (within a few moments) that
are connected and sync them.
NOTE: The spinning icon next to the iPads listed on your laptop means those are the iPads in the syncing process. Once the
spinning icon is no longer present, syncing is complete.
6C. After syncing is completed, close iTunes to eject all iPads.
STEP 7: Remove the USB cable from the port on the right side panel of the cart.
NOTE: iPad devices will not sync and charge simultaneously. Once the sync process is complete, the Tablet Cart system will
automatically being charging the devices once the laptop is disconnected from the cart.
STEP 8. Lock the tambour doors on the front of the unit for security.