


724-746-5500 | blackbox.com
Page 11
Chapter 3: Configuration and Setup
3. Configuration and Setup
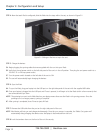
STEP 1: Unpack the cart.
1A. Unpack the cart and set aside packaging material until unit has been completely set up and is fully functional.
NOTE: The power switch on left cart side panel must be in the “OFF” position before plugging the Tablet Cart into a wall
receptacle.
1B. Open and inspect the cart to verify all doors and locks are operating properly.
NOTE: Do not plug the cart into wall outlet until all configurations and setup are complete.
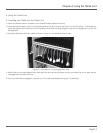
1C. Open the tambour doors on the front of the cart.
NOTE: You will need to supply a padlock if you choose to secure the cart.
STEP 2: Configure your laptop.
2A. Configure iTunes on the laptop that will be used with the cart.
NOTE: The laptop is not included with the cart.
2B. iTunes is designed to automatically scan for new software updates for iTunes and any iPads plugged in to the laptop equipped
with iTunes. This feature may cause issues with syncing multiple iPads at once.
2C. To avoid scanning, choose “Preferences” from your iTunes menu. On the “General” tab, uncheck “Check for new software
updates automatically.”
STEP 3: Configure each iPad to work with your laptop.
3A. Individually connect the iPads to the laptop you will use with the cart.
3B. Manually open iTunes and select your iPad if the program does not open on its own.
3C. You may be requested to complete the naming and registration process for your iPads. Please do so at this time.
3D. Choose the Summary tab for your iPad unit.
3E. Under the Options window complete the following:
3F. To activate iTunes and start the syncing process, enable “Open iTunes when this iPad is attached.”
3G. To allow for optimal control of synced media, choose “Sync only checked songs & videos.”
3H. Disable the “Manually manage music and videos” function so that you will need to manually drag music and videos to the
individual iPad.
3I. The remaining tabs will allow you to choose your desired programs to sync to your iPad.
3J. Choose the “Sync” or “Apply” icon. The “Sync” icon will revert to “Apply” and “Cancel” icons when sync settings are
adjusted.
NOTE: Complete STEPS 3A–3J for each individual iPad to be used within the cart.