


4
3.5
805S/HTM2D/HTM3S/HTM4S
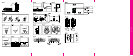
These systems should be mounted on a
firm shelf or stand that allows the sound
to be properly directed to the listeners.
For the 805S, we recommend the use of
the FS-N805 stand that supports the
speaker at the correct listening height.
For the HTM2D, HTM3S and HTM4S,
the FS-NHTM stand supports these
centre speakers low down so that the
top of the speaker is no higher than
60cm (2 ft) from the floor, commensurate
with positioning them below a large
screen. The stand allows the speaker to
be tilted back by 0º, 4º or 8º.
Follow the instructions supplied with the
stand in each case.
When mounting the speakers on a
bookshelf, stick the 4 self-adhesive
rubber feet to the base of the speaker.
(figure 27)
f Go to section 4.
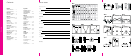
3.6 SCMS
The speaker is designed to be fixed to a
wall and is supplied with a bracket that
allows adjustment of both horizontal and
vertical angles. (figure 29) The bracket
should be fixed to the wall using screws
in the range 5mm to 6mm diameter
(No.10 to No.12). The screw length
should be chosen to give a minimum of
25mm (1 in) engaged thread. (figure 28)
Hold the template provided against the
wall in the desired position and use a
spirit level to line it up properly. The
outside dimensions of the template
correspond to the rear of the cabinet.
Note especially that the centre of the wall
plate does not coincide with the centre
line of the speaker.
Mark the fixing holes on the wall and drill
and plug the wall.
Ensure that the screw length and
wall plug security are sufficient to
hold the weight of the speaker. When
fixing to drywall construction, try to
arrange for the screws to go into a
stud. B&W can accept no liability for
any failure of wall or ceiling fixings.
Screw the wall plate D to the wall and
test the firmness.
Part screw two of the supplied machine
screws into the upper two threaded
inserts in the back of the cabinet.
Offer the speaker up to the speaker plate
E, locating the two scr
ew projecting from
the back of the speaker into the slots at
the top of the plate.
Fit the remaining two machine screws
through the plate E into the lower
threaded inserts in the cabinet and
tighten all four.
Set the vertical angle of the speaker by
adjusting screw B.
Fully tighten screw A.
Adjust screws C so that the friction of
the three vertical hinges allows you to
adjust the bracket but hold it in place
once set.
Connect the speakers as described in
section 4 before continuing.
Set the required horizontal angle and
push the speaker back to the wall, but
leave a little clearance to avoid rattles.
f Go to section 4.
3.7 DS8S
The speakers may be fixed to a wall or
ceiling using screws in the range 5mm to
6mm diameter (No.10 to No.12).
On the back of the cabinet are three wall
plates. The screw head should be
inserted into the round part of the
aperture and slid fully along one of the
slots. The slots are sprung loaded to
prevent the speaker being readily
knocked out of position. The screw
length should be chosen to give a
minimum of 25mm (1 in) engaged thread.
(figure 28)
Ensure, especially when fixing to drywall
panels, that the screw length and wall
plug security are sufficient to hold the
weight of the speaker. B&W can accept
no liability for any failure of wall or ceiling
fixings.
Use the template provided to mark the
screw positions. The outside dimensions
of the template correspond to the rear of
the cabinet.
Stick 4 of the clear self-adhesive rubber
pads to the rear panel of each speaker,
one close to each corner. These stop the
speaker vibrating against the surface and
help keep it in position. (figure 30)
Adjust the protrusion of the screws such
that the rubber pads are a friction slide
on the surface when the wall plates are
hooked over the screw heads. (figure 31)
Always check and ensure that:
• All the screws slide right to the
ends of the slots in the wall
plates.
• Screw protrusion is adjusted so
that the rubber pads provide
enough friction to prevent the
speakers sliding out of position.
f Go to section 4.
4
CONNECTIONS
All connections should be made with the
equipment switched off.
The terminals accept a variety of cable
terminations to suit most applications –
4mm banana plugs, 6mm and 8mm
(1/4 in and 5/16 in) spades, or bare wires
up to 6mm (1/4 in) diameter.
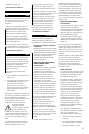
Important safety notice
In certain countries, notably those in
Europe, the use of 4mm banana
plugs is considered a potential safety
hazard, because they may be
inserted into the holes of
unshuttered mains supply sockets. In
order to comply with European
CENELEC safety regulations, the
4mm holes in the ends of the
terminals ar
e blocked by plastic pins.
If you are using the products in any
country where these conditions
apply, you should ensure that any
banana plugs cannot be used in an
unsafe manner by children or other
uninformed persons.
Ensure each positive terminal on the
speaker (coloured red and marked +) is
connected to the positive output terminal
of the amplifier and negative (coloured
black and marked -) to negative.
Incorrect connection may result in
impairment of frequency response, poor
imaging and loss of bass.
Always screw the terminal caps down
fully to prevent rattles.
Model f Go to
DS8S 4.3
All other models Continue
All models in the range except for the
DS8S may be bi-wired or bi-amplified. In
3-way systems, one set of terminals
feeds the bass drivers and the other the
midrange and tweeter. In 2-way systems,
one set of terminals feeds the bass/
midrange driver and the other the tweeter.
Separation of the signal paths to each
section of the speaker can improve
imaging and the resolution of low-level
detail, and allows the user to optimise
the cable to the frequency range of use.
Bi-wiring involves the use of two
separate 2-core cables from the same
amplifier, one to each pair of terminals.
This is the minimum we would
recommend, but should you prefer to
single wire, perhaps during the initial set-
up pr
ocedur
e or because you do not
want to see a multitude of cables in the
room, you must connect both positive
and both negative speaker terminals
together
.