


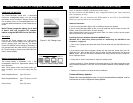


The MP-2000 may also be used as a voice recording device, with its built-in
microphone, you can use it for notes, quick reminders, dictation, or a speech.
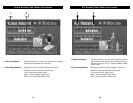
How to Record a Voice File:
1. Select Voice Record by pushing the 4-way navigation button up or down. Then,
after selecting the Voice Record function, depress the ENTER button, and then
press the REC button to start recording, Note that the Record LED will flash, indi-
cating that recording is in progress and the record screen will show the elapsed
time and quality mode of the recording in progress. The built-in microphone is
quite sensitive, optimum range is 12”-36” from microphone.
2. To stop recording, simply press REC button again. You will see a recording file
name generated and placed in the Record sub folder that is located in the Music
menu of the unit. The file name starts from [V000000.mp3], [V000001.mp3], etc.
Note: The maximum length of the recording depends on how much available hard
drive space is left while recording.
Play a Recorded Voice File:
1.To play a recorded voice file, exit Record mode and go to the Music menu.
2. Browse the “record” folder using the 4-way navigation button that is located in
the Music Menu.
3. Once the required voice file is selected, press down the ENTER button to play
the file.
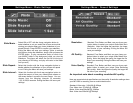
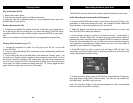
Delete a Recorded Voice File:
To delete a recorded voice file, select it on the list. Push the 4-way navigation but-
ton to the left; you will see a Dialog Box (see below) to confirm the deletion. Push
the 4-way navigation button left or right to select Yes/No, and press ENTER for
your selection.
Note: You can also use Windows Explorer to manage/delete
recorded files when the E2GO MP-2000 is connected to your PC.
See p. 13 for further details.
Note: The maximum length of the recording depends on how
much available hard drive space is left while recording.
Recording Video to your Unit
28
The MP-2000 can also record Video. Please read the following to learn more.
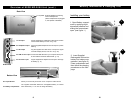
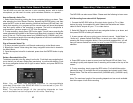
A/V Recording from external A/V Equipment:
1. Connect the MP-2000 with an AV output device (such as TV or Video
device) by using the supplied AV cable Match the Red,white and Yellow
cable to the AV outputs on your TV or video device.
2. Select AV Record by pushing the 4-way navigation button up or down, and
then press ENTER to make your selection.
3. A menu screen will pop up giving you a choice to record “Audio/Video” or
“Audio only” please choose Audio/Video to record your video. Select by
pressing the 4-way navigation button. Once you have accessed this, you will
see your source material on screen, be sure to press ENTER to make your
selection.
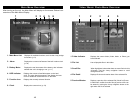
4. Press REC button to start to record, and the Record LED will flash. Your
recording’s quality and elapsed time of recording will be seen at the top of the
screen.
5. To stop recording, simply press the REC button. For Audio/Video option
selected at step 2, a recorded file will be generated and placed under Video\
Record folder. The files will be named from [AV00000.mp4] - [AV00001.mp4],
and etc.
Note: The maximum length of the recording depends on how much available
hard drive space is left while recording.
Using the Voice Record Function
27