


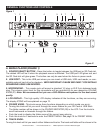


BPM’s (Beats per minute) while it is playing. This will allow you to match the beats between two play-
ing song's or any other music source. Remember, this is a momentary function. When you remove
your finger from this button, the BPM’s will automatically return to normal. Holding down this button
will increase the pitch to whatever the PITCH PERCENTAGE SELECTOR (13) is set to.
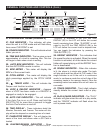
13. PITCH PERCENTAGE SELECTOR- When the PITCH KNOB (11) is activated use this button to
choose a pitch percentages of 4%, 8%, and 16%. See page 22 for more details.
14. PLAY/PAUSE BUTTON - Each press of the PLAY/PAUSE BUTTON causes the operation to
change from play to pause or from pause to play. While in play mode the green LED will glow, and
while in pause mode the green LED will flash.
15. CUE - Pressing the CUE button during playback immediately pauses playback and returns the
track to the last set cue point (see setting a CUE POINT, page 15). The red CUE LED will glow when
the unit is in cue mode. The LED will also flash every time a new CUE POINT is set. The CUE button
can be held down to momentarily play the track. When you release the CUE button it instantly returns
to the CUE POINT. You can also tap the CUE button to create a BOP EFFECT.
16. SGL/CTN - This function allows you to choose between single track play or continuous track play
(all tracks in order). Hold this button down for 1 second to activate the Auto Cue function. See page
14 for AUTO CUE.
17. TIME MODE - The TIME button will switch the time value described in the TIME METER between
ELAPSED PLAYING TIME, and TRACK REMAINING TIME.
18. ADV. TRACK BUTTON - While either playing a track or in pause mode, press this button to
search for the next track you want to play. When you press this button you will enter ADV. TRACK
mode, the TRACK INDICATOR (41) will flash. Use TRACK KNOB (6) to search for the track you want
to play. Press the TRACK KNOB (6) once you have found your desired track. The LCD will display
"Search..." and then "FOUND" once the track is found. When the track that is playing comes to an
end press the TRACK KNOB (6) once more to play the track that you searched for. You can also press
the TRACK KNOB (6) to stop current playback and start playback on your seleted track. Please see
page 18 for complete instructions.
19. FRAME SEARCH BUTTONS - The search buttons will let you scan through a track, either
backwards or forwards, frame by frame. If you hold either of the buttons down you will search faster
through the frames.
20. MASTER VOLUME CONTROL - This knob is used to control the master output level. To avoid
speaker damage that may be caused by excessive volume, be sure this knob is always set to the
lowest level before turning the unit on.
21. MICROPHONE VOLUME CONTROL - This knob controls the output volume of the MICRO-
PHONE (3).
22. SD CARD SLOT - This is where you load your SD card. Gently insert your SD Card into the slot.
To eject your card, put the Media Operator in pause mode, and then press the SD Card gently. The
SD Card should "Pop" out. VERY IMPORTANT: PLEASE SEE PAGE 7 FOR DETAILS REGARD-
ING/USING SD CARDS.
23. POWER BUTTON - Press and hold this button for at least 2 seconds to power the unit on and
off.
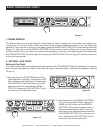
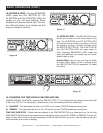
B. MEDIA OPERATOR - REAR (FIGURE 2)
GENERAL FUNCTIONS AND CONTROLS (Cont.)
©American Audio® - www.americanaudio.us - Media Operator™ Instruction Manual Page 10