Operation
12
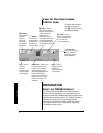
12'4#6+10
5%#00+0)
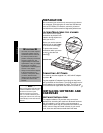
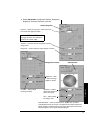
1. Place the paper face down on the scanner. Line up the
corner of the paper with the arrow at the inside corner
of the scanner’s glass. Be sure to keep it within the
correct document size marker.
2. Double-click
q
qq
q
on the Windows taskbar. The
onscreen scanner control panel appears.
3. Click
p
pp
p
on the onscreen scanner control panel, or
press
Y
YY
Y
on the scanner. The
USB Scanner
box
appears.
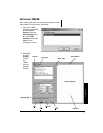
4. Under
Scanner Settings
, make any necessary
adjustments under
General
and
Advanced
.
5. Click
Scan
to scan the image.
To send the scanned image to another application after
scanning, you must wait at least ten seconds for the post-
processing application to load.
±
±±
±
%12;+0)124+06+0)
Use the Copy/Print function to scan images or documents
and send them to the printer.
1. Place the paper face down on the scanner. Line up the
corner of the paper with the arrow at the inside corner
of the scanner’s glass. Be sure to keep it within the
correct document size marker.
2. Double-click
q
qq
q
ý
on the Windows taskbar. The
onscreen scanner control panel appears.
3. Click
t
tt
t
on the onscreen scanner control panel or
press
X
XX
X
on the scanner's control pad to scan the
image.
4. After the image is scanned, wait at least ten seconds
for the
Print
box to appear.
5. Set the
Picture Position
and the number of
Copies:
.
3LFWXUH#LQ#WKH#&HQWHU
3LFWXUH#LQ#WKH#&HQWHU3LFWXUH#LQ#WKH#&HQWHU
3LFWXUH#LQ#WKH#&HQWHU
— prints the image in the center of
the paper.
3LFWXUH#)XOO#3DJH
3LFWXUH#)XOO#3DJH3LFWXUH#)XOO#3DJH
3LFWXUH#)XOO#3DJH
— resizes the image to print on the
entire page length or width.
±
"016'"
±
"
You can select images to be sent
to any available post processing
application in the TWAIN Scanner
Setting window. See “Preferences”
on Page 14 for more information
about the settings.