


5
2M-Z15782, Toastmaster Heater Proofer 9451-HP Series
Operating Instructions
Startup
1. Push ON/OFF rocker switch to “ON” position
2. Push HEAT/PROOF switch to HEAT for heating.
3. Turn HEAT thermostat knob fully clockwise for pre-heat.
4. Allow 45 minutes for pre-heating, then turn thermostat to desired setting.
5. For proong, push HEAT/PROOF switch to PROOF.
DO NOT RUN WATER PAN EMPTY.
Note: While in proof mode only the element around the water pan is on.
6.
Adjust the heat and humidity thermostat knobs to control desired temp and humidity. 45 min pre-heating.
Note: The internal air circulation blower will operate continuously when the power switch is turned “ON”.
Heat Knob (Heat Mode)
The controlling range is 80° to 185°F ( 26° to 85°C) temperatures vary slightly between insulated and non-insulated
units. The dial has setting from 1 to 9 that do not relate to any specic calibrated temperatures. Temperature settings
must be obtained through familiarization with the unit. While in the heat mode this knob controls the two elements in
the air stream, in the “OFF” position the elements are turned off. During the “Proof” mode one of these elements is
not in use.
Humidity Knob (Proof Mode)
To control the humidity range from 30% to 100% humidity, settings must be obtained through familiarization with the
unit. The dial has a range of 1 - 9 which determins the temperature of the water in the pan, if you have the knob in the
“OFF” position it will turn the proong element off. While in proof mode the unit will operate at a lower termperature.
Allow 45 minutes to pre-heat in both heat & proof cycle.
Troubleshooting
CAUTION: Before disassembling unit, electrical power must be disconnected by unplugging the unit. Failure to
unplug the unit prior to servicing may result in electrical shock.
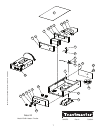
Each unit is shipped with an instruction manual to be used as a reference guide for all service areas. The manual
shows a picture of the drawer, showing the location of electrical components and a description of each. If the unit
does not operate correctly, or malfunctions for any reason, the following checklist should provide a solution.
1)
Check to make sure cord set is rmly plugged into the power receptacle in the back of the cabinet and
into the wall outlet.
2) Check circuit breaker of wall outlet and reset if necessary.
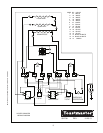
3) Remove heat drawer from cabinet. Remove bottom cover of drawer. Visually inspect for:
a) Loose or disconnected wires
b) Black marks or burning on any components
c) Loose heating elements.
4)
If any burn marks or discoloration of wires is note on any components along with all wires attached to
damaged components must be replaced.
5)
If heater element is loose, or if it has broken loose from mounting tabs, the wires will short out on the
Metal, causing permanent damage. Both the element and main power switch (with wires on switch) must
be replaced.
6)
If temperature on “L.E.D. Thermometer” is not reading a constant temperature, it must be replaced. If
temperature has exceeded 200°F (93°C) it must be lowered immediately to maximum temperature of
185°F (85°C).
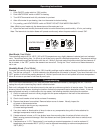
ON
OFF
HEAT
HEAT
HEATER/PROOFER
POWER HUMIDITY
PROOF
IL2428