


14 English
English 14
English 15
After you have set the timer, the unit will start auto-
matically at the time shown by the TIMER indication
on the display. If you no longer want to use the timer,
you must cancel it.
To
Press the TIMER ON/OFF button....
Cancel the timer Once.
Result: is no longer displayed.
Restart the timer Twice.
Result: is displayed again.
• When
you select the TIMER OFF mode, the TIMER
RECORDING and TIMER function are not available.
Cancelling the Timer
9.
Press the ENTER ( ) button.
Result: REC N is displayed. You can press the TUN-
ING/ALBUM , or . button to select REC Y or REC
N, and then press ENTER
( )
button.
1.
If you select REC N, the Mini will not record when
it turns on. If you have already set a tuner timer
recording, selecting REC N cancels it. Note that
the Mini will still turn on and off at the times you
set earlier in this procedure.
2.
If you select the REC Y, you can set the Mini to
record when it turns on. The recording switch on
and switch off times can be different from the
timer switch on and off times you set earlier in
this procedure.
a.
Press the ENTER
(
) button.
Result: ON is displayed for a few seconds. You can
set the tuner timer recording switch-on time.
b.
Press the ENTER
( ) button.
Result: OFF is displayed for a few seconds. You can
set the tuner timer recording switch-off time.
• The maximum tuner timer recording time is 5
hours.
• If the timer switch on and off times are identical,
the word ERROR is displayed.
• When there is no disc in or USB connected to the
Mini, if you select the "CD" or "USB", the Mini
automatically selects "TUNER".
• You may use the
]
,
[
buttons on the main unit
instead of the TUNING/ALBUM
,
or
.
button to
adjust settings in Steps 4 through 9.
• If the switch-on or -off time is the same as the
timer recording time, only the switch-on or -off
time is effective, and the timer recording time is not
applied.
• If the auto timer is turned on, the MP3/CD or
USB function may require an additional step to be
activated depending on the disc (or device). It is
better for you to select the tuner function instead.
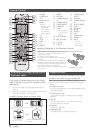
You can store up to:
15 FM stations.
1.
Select FM by pressing the TUNER/AUX button.
2.
To sear
ch for
a station
Press the TUNING MODE button
Preset
One or more times until PRESET is
displayed. You can search the
stored frequencies in the Preset
mode.
Manually
One or more times until MANUAL is
displayed.
You can
search the fre-
quencies one by one in the Manual
mode.
3.
S
elect th
e station to be stored by:
• Pressing t
he TUNING/ALBUM
,
or
.
button on
the remote control to select the preset station.
• P
ress and hold the TUNING/ALBUM
,
or
.
button
on the remote control to automatically search for
active broadcasting stations.
4.
Press the MO/ST button to switch between stereo
and mono.
• In a poor reception area, select MONO for a
clear, interference-free broadcast.
• This app
lies only when listening to an FM station.
5.
If you do
not want to store the radio station
found, return to Step 3 and search for another
station.
Otherwise:
a. Press the ENTER button.
b. Or, press the TUNING/ALBUM button on the
remote control to select a program number.
c. Press the ENTER button to save the preset.
6.
To store
additional radio frequencies, repeat Steps
3 through 5.
➣
In Tuner mode
• In the Manual mode, you can use the
[
or
]
button on the main unit to manually search for a radio
station.
• In the Preset mode, you can use the
[
or
]
button
on the main unit to search for a stored radio station.
You can listen to a stored radio station.
1.
Select FM by pressing the TUNER/AUX button.
2.
Press the TUNING MODE button on the remote
control until “PRESET” is displayed.
3.
Press the
[
or
]
button on the main unit or
the TUNING/ALBUM
,
or
.
on the remote
control to select a desired preset number.
Selecting a Stored Station
Listening to Radio