


12 - English
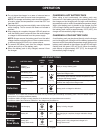
OPERATION
Use the UP/DOWN arrow buttons to select the desired
preset position number for the station (1-10).
Press and hold the PRESET button for three (3) seconds
to lock the station into memory. The preset position num-
ber and the station frequency will stop flashing when the
station is locked in.
The display will revert to the last frequency tuned to if the
preset is not locked in within ten (10) seconds.
NOTE: When setting presets, all other control buttons
(MODE, CLOCK) will not be recognized when pushed.
To tune to presets (FM or AM mode):
Push and release (do not hold) the PRESET button
quickly.
One push will advance to the next preset position number
and its associated frequency. Simply stop at the desired
preset frequency.
SETTING THE CLOCK
See Figure 4, page 16.
To set time:
NOTE: Time is displayed in 12-hour format only.
Press and release the CLOCK button. The time and the
clock icon will be displayed in place of the frequency for
ten (10) seconds. The display will revert to the current
frequency after ten (10) seconds.
While time is being displayed, push and hold the CLOCK
button for two (2) seconds. The HOUR will begin to flash
On/Off at half second (0.5 second) intervals.
Use the UP/DOWN arrow buttons to change the hour
display to the desired number. For PM settings, scroll
through the first 12 numbers until PM is displayed.
Press the CLOCK button again to lock in the hour set-
ting. MINUTES will begin to flash On/Off at half second
(0.5 second) intervals.
Use the UP/DOWN arrow buttons to change the minute
display to the desired number. Press the CLOCK button
again to lock in the time setting. The display will revert
to the frequency display and the time can be viewed by
pressing and quickly releasing the CLOCK button.
To view time:
NOTE: Time is displayed in 12-hour format only.
Press and release the CLOCK button. The time and the
clock icon will be displayed in place of the frequency for
ten (10) seconds. The display will revert to the current
frequency after ten (10) seconds.
USING MP3 AND CD PLAYERS
See Figure 5, page 17.
Select AUX MODE.
Open the MP3 compartment door by pulling up on the
door tab.
Make sure the MP3 player will fit inside the compartment
provided.
NOTE: CD players will not fit inside the provided compart-
ment.
CD players can simply be placed on the top of the hous-
ing. The AUX cord can be routed through the slots in the
door.
Connect the integrated 3.5 mm auxiliary connector to the
MP3 player.
Make sure that the auxiliary connector wire is positioned
so that it is not pinched if the door is closed.
The MP3 player must be ON and in PLAY mode for sound
to be heard through the speakers.
All MP3 player controls can be used normally while con-
nected to radio.
NOTE: Volume for any device connected through the
auxiliary connector can be adjusted using the volume
control for that device or with the VOLUME control knob
on the radio.
Turning the radio OFF will NOT turn the MP3 player OFF.
To protect the MP3 player from environmental hazards
such as dust, moisture, etc., the MP3 compartment door
must be closed.
The auxiliary connector DOES NOT provide charging
function.
For complete operating instructions for all MP3 and CD
players, always refer to the manual that was included with
your model.
Most CD players are too large to fit inside the internal
compartment. To use these devices, open the compart-
ment door to access the auxiliary connector, and connect
the device as described above. Turn on the CD player and
adjust the volume to the desired level.
CHARGING
See Figure 6, page 17.
Battery packs are shipped in a low charge condition to
prevent possible problems. Therefore, you should charge
them before first use. If the charger does not charge your
battery pack under normal circumstances, return both the
battery pack and charger to your nearest repair center for
electrical check.
Make sure the power supply is normal household voltage,
120 volts, AC only, 60 Hz.
Connect the radio/charger to a power supply.
Attach the battery pack to the charger by aligning the
raised ribs on the battery pack with the grooves in the
charger, then slide the battery pack onto the charger.
Press down on the battery pack to be sure contacts on
the battery pack engage properly with contacts in the
charger.
Latches should snap into place to ensure charger is cor-
rectly connected.