


11 - English
OPERATION
NOTE: If all power sources (AC cord, One+ battery Pack,
and AAA backup batteries) are disconnected from the unit
for an extended period, the unit may require a 10 – 30 minute
waiting period to resume normal operation.
NOTE: Always remove the battery pack from the radio/
charger before unplugging the unit from a power source,
or before plugging the unit into a power source. Connect-
ing the product to a power source with the battery pack
installed could affect the performance of the radio/charger
or the battery pack.
GENERAL USAGE TIPS
RECEPTION
To decrease interference or electrical noise, reception may
be improved by rotating the antenna or moving the radio to
a higher elevation.
ANTENNA
The antenna rotates to help improve reception. The flexible
design prevents damage from bending. It folds down and
out of the way when not in use.
LCD DISPLAY
See Figure 4 - 5, page 16.
When the radio is not connected to a power supply, the LCD
display will display the time only. If the radio is connected to
a power supply and in the ON position, LEDs will light the
display. You can view the time, frequency, and settings in
use on the LCD display.
If an 18 V battery pack is connected as the power supply
and the battery charge is low, a flashing low battery indicator
will be displayed. [ ]
NOTE: Charge battery when low battery indicator begins
to flash by connecting the AC cord. If the radio continues
to operate with the low battery indicator flashing, the radio
will drain the battery until the radio no longer emits sound.
To avoid deep discharge, connect the AC cord to charge
the battery pack.
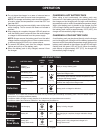
TURNING THE RADIO ON/OFF
See Figure 4, page 16.
Turn the ON/OFF/VOLUME knob to turn the radio ON or
OFF and to adjust the volume.
When the radio is on and the AC cord is used to connect
the radio to a power supply, the [
MODE
SCAN
TIME
VOLUME
+
+
TUNE / SEEK
] symbol will be shown
in the LCD display.
When the radio is on and a battery pack is connected as
the power supply, the [ ] symbol will be shown in the
LCD display.
ADJUSTING THE VOLUME
See Figure 4, page 16.
To increase the volume: rotate the ON/OFF/VOLUME
knob clockwise.
To decrease the volume: rotate the ON/OFF/VOLUME
knob counterclockwise.
MODE SELECTION
See Figure 4, page 16.
To switch modes, press the MODE button. The selected
mode will be displayed above the frequency. Press the
MODE button until the desired mode is selected. There are
three modes:
FM mode
AM mode
AUX: For the 3.5 mm input jack located inside the MP3
player compartment.
NOTE: When turned on, the radio will return to the last mode
that was used.
MANUAL TUNING
See Figure 4, page 16.
The TUNE/SEEK buttons are used to manually tune to the
desired radio frequency. The selected frequency is displayed
on the LCD.
Press the TUNE/SEEK/DOWN button to tune to a lower
frequency and press the TUNE/SEEK/UP button to tune
to a higher frequency.
Briefly push either button (not press and hold) to tune one
frequency step at a time.
SEEK FUNCTIONS
See Figure 4, page 16.
Use the TUNE/SEEK buttons to quickly find audible frequen-
cies. Each frequency with clear reception can be viewed on
the LCD display.
To use the SEEK feature:
Press and hold TUNE/SEEK/UP button for one second
to tune to the next higher frequency with clear reception.
Press and hold TUNE/SEEK/DOWN button for one
second to tune to the next lower frequency with clear
reception.
STORING A PRESET IN MEMORY
See Figure 4, page 16.
The memory feature saves up to 20 frequencies as presets in
the radio’s memory. You can save up to ten (10) frequencies
each for FM and AM modes.
To add presets (AM or FM mode):
Tune to desired frequency either manually or by using the
SEEK feature.
Press and hold the PRESET button for one second.
The word PRESET and the Preset Position Number will
both appear in the display. The Preset Position Number
and the frequency will be flashing on/off at half second
(0.5 second) intervals.