


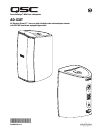

4
Mounting (continued)
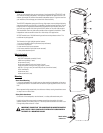
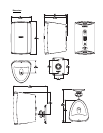
Ball Mount Adapter
The included ball mount adapter can be attached to almost any flat
surface. To use the wall mount adapter, secure the wall adaptor using
four to six screws. Ensure the mounting surface is sufficiently strong to
support the loudspeaker and any vibration or seismic activity.
•Connect the shaft of the mount to the speaker. Tighten the locking
nut.
•Connect the wiring to the loudspeaker and install the terminal cover,
if desired.
•Snap the ball mount into the wall adaptor.
•Adjust the angle of the loudspeaker and tighten the knob fully.
The ball mount can also be installed in the top or bottom of the enclosure for
special application use by removing the plastic plugs from the yoke mount screw
holes and following steps above.
Yoke mount
Secure the yoke mount to the mounting surface. Attach the loudspeaker to the
yoke mount using the retaining knobs provided. Aim the loudspeaker and tighten
the knobs securely.
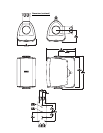
Safety Cable Attachment
On the back of the loudspeaker, near the bottom, is a safety cable attachment
point. Install a safety cable strong enough to support several times the weight of
the loudspeaker assembly in the event it may fall. The cable must be secured to a
secondary support point which is also strong enough to support several times the
loudspeaker’s weight. The safety cable should not be attached to the primary
mount.
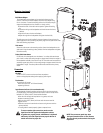
Connection
AD-S32T
On the AD-S32T you must set the transformer tap selector
switch to the appropriate setting before applying audio signals.
Terminations
The terminals will accept:
•bare wire (up to 0.10” or 2.59 mm diameter)
•spade lug terminals
Input Connection Cover (wire termination only)
The loudspeaker includes a weather resistant cover for the input terminals.
For proper sealing, the cable jacket must be round (or close to round) and be
between 0.12” (3mm) and 0.2” (5mm) outside diameter.
•Pass the wires through the compression nut, gasket, and cover.
•Loosen the terminal screws.
•Strip the wires 0.39” (10mm) and insert under the screw terminal.
•Tighten screws.
•Slide the cover over the terminals and secure using the two machine
screws provided.
• Ensure gasket is seated properly; tighten compression nut.
To assure weather-tight connections, make sure the
Input Cover fits flush against the loudspeaker cabinet,
all gaskets are properly placed, and hardware is tightened
sufficiently. Use of the Input Cover may require the use of
smaller wire sizes for proper fits.
NOTE! You cannot use spade lugs when
the Input Connection Cover is used. Connect
the wires directly to the terminals if using the
Input Cover.