Changing your own position with respect to a room's boundaries may also bring a
big effect, sometimes for a small change. Getting further from the wall behind you
may make sound more precise and localized. Getting closer may make sound more
“mellow” and integrated. Coming too close – to back wall, side wall, or (especially) a
corner – you may experience a major peak or cancellation of a certain band of
frequencies. It depends on factors we can't cover fully here but do get into on our
web site.
IV. INSTALLATION
The VS300 has a number of ways for mounting,
both on wall and table-top. As shipped it will
come with its on-wall bracket already attached.
The two feet (included) will let you use it as a
horizontal center channel either on top of a TV
set or on a table in front of a television.
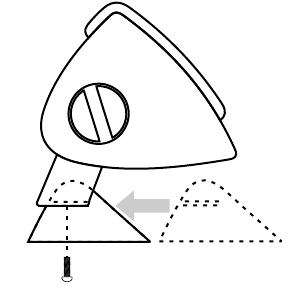
To mount the feet, loosen both knobs and
extend the mounting bracket to create some
space between the bracket and the VS300.
Slot the feet onto the bracket and fasten them
with the two small Philips head (cross-head)
screws provided. Angle the system as required
and snug down the two knobs to hold the
system in position.
On-Wall Mounting
When wall mounting the VS300 certain tools and materials may be required as well
as a certain expertise. If wires are to be fully hidden within the walls of your house
then your best bet is to hire an experienced custom installer. (Look for a local CEDIA
certified installer in your area.) If your wires are to remain external to the walls then
you can wall mount the system as long as you are handy with a few basic tools and
feel confident in the process. One simple approach to hiding the wires is to put them
into the walls and let them drop down to the floor level where they can exit the walls
through a simple wall plate. This can be achieved with the minimum amount of wire
fishing and will get the wires cleanly down to a point where they are much less
visible, perhaps fully hidden by an equipment cabinet.
The following tools are useful for on-wall mounting of a VS300:
Tape Measure, Pencil, and Level
Philips Screwdriver and Putty Knife
Drill and Bits (smaller for lead holes and larger for cabling)
Each on-wall bracket includes two smaller holes for attachment to the wall and a
larger central hole for the wire to enter the wall through. Using the guidelines below,
determine the best location for your VS300's. Remove the brackets from each
speaker and use them as a guide for the location of the mounting holes. The level
will assure that the systems are at right angles to the TV and the horizon. Use a
sufficiently strong wall mount. The only kind that we recommend are the metal
expanding or “butterfly” style or the newer type were a large plastic screw pre-
Center Channel Feet
7


