


SUPPLIED ACCESSORIES
– remote control
– video cable
– AC mains lead
– Stand
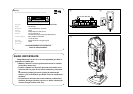
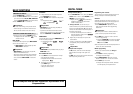
TOP AND FRONT PANEL (See 1)
1 Display
–
shows the status of the set
2 [dB]:
–
meter to indicate bass power
3 STANDBY ON y
–
switches the set on/ off.
4 VOLUME
– adjusts volume level or equalizer level
5
Source selector
–
selects sound source
for functions: CD/ FM / MW / GAME AUX.
6
p –
3.5 mm stereo headphone jack.
Helpful Hints:
The speakers will be muted when headphones are
connected to the set.
7 OPEN•CLOSE
–
press to open/ close CD door
8 AUDIO ( IN Left / Right)
–
keeps audio plug in
place.
VIDEO (IN)
–
keeps video plug in place
9 ALBUM/PRESET -, +
MP3-CD only :
–
selects previous/next albums.;
FM/MW : selects previous/next preset stations.
SEARCH ∞ , §
MP3-CD/audio-CD:
–
skips and searches tracks
backward/forward.
FM/MW : - searches radio stations.
2;
–
s
tarts or pauses CD playback
9
–
stop
CD
playback;
–
erases a CD program
0
IR SENSOR – infrared sensor for remote control
! GAMESOUND
–
select sound effects: BLAST/
PUNCH/ SPEED/ NORMAL in GAME AUX mode
EQUALIZER
–
selects bass, mid and treble
frequencies.
PROG
MP3-CD/audio-CD:
–programs tracks and
reviews the programmed
songs;
FM/MW :
–programs preset radio stations.
MODE
–
selects different CD play modes: e.g.
REPEAT or SHUFFLE order.
MAX SOUND
–
activates or deactivate the
optimal mix of various sound
features.
BACK PANEL (See 1)
@ Telescopic antenna
–
improves FM reception
# Battery compartment – for 8 batteries, type
R-20, UM-1 or D-cells
$ AC MAINS – inlet for power cord
% VIDEO OUT – connects to the VIDEO IN jack on
a TV or VCR for viewing or recording.
^ HANDLE
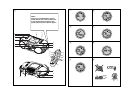
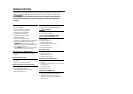
Optional stand for vertical mounting (See C)
With the optional stand, you are allowed to mount the
set vertically. It helps you arrange your available
space more flexibly.
1. Put the stand on a horizontal, vibration-free and
stable surface.
2. Take the set by handle, with the AC MAINS at the
lower side.
3. Align the handle on the other side with the space
in the middle of the stand.
4. Mount the set upright and firmly onto the stand.
5. Fasten the bolt on the stand by pressing it and by
rotating it clockwise.
English CONTROL
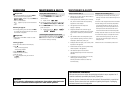
REMOTE CONTROL (See 1)
1 CD
–
selects CD sound source
FM/MW
–
selects tuner source / wavebands
AUX
–
selects GAME AUX
2 y
–
switches the set to standby / on if AC powered
(Switches set off only if battery powered)
3 REPEAT
–
selects repeat modes in CD source;
SHUFFLE
–
selects shuffle modes in CD source;
MUTE
–
interrupts/ resumes sound.
4 VOL 4, 3
–
adjusts volume or equalizer level.
5 ¡ , ™
–
selects previous/ next tracks in a
MP3-CD/audio CD;
9
–
stops CD playback;
–
erases a CD program.
2;
–
starts or pauses CD playback
5 / 6
–
searches backwards/ forwards within a
MP3-CD/audio CD track.
–
searches radio stations.
6 EQUALIZER
–
selects bass, mid and treble
frequencies
MAX
–
selects special bass enhancement on/ off
GAMESOUND
–
selects sound effects: BLAST/
PUNCH/ SPEED/ NORMAL in game mode
7 ALBUM/PRESET
-, +,
MP3-CD only :
–
selects previous/ next albums.
FM/MW :
–
selects previous/next preset station.
POWER SUPPLY
Whenever convenient, use the power supply to
conserve battery life. Make sure you remove the
power cord from the set and wall jack before inserting
batteries.
Using batteries (not included)
Main set (See A)
• Insert 8 batteries, type R-20, UM-1 or D-cells,
(preferably alkaline) with the correct polarity.
Remote control (See B)
• Insert 2 batteries, type AAA, R03 or UM4
(preferably alkaline).
Helpful Hints:
•Incorrect use of batteries can cause electrolyte
leakage and will corrode the compartment or
cause the batteries to burst.
• Do not mix battery types: e.g. alkaline with carbon
zinc. Only use batteries of the same type for the
set.
• When inserting new batteries, do not try to mix old
batteries with the new ones.
Batteries contain chemical substances, so they
should be disposed of properly.
Using AC power
1. Check if the AC power supply, as shown on the
type plate located on the bottom of the set,
corresponds to your local power supply. If it does
not, consult your dealer or service center.
2. If your set is equipped with a voltage selector,
adjust the selector so that it matches with the
local power supply.
3. Connect the mains lead to the wall jack and the
set is now ready for use.
Helpful Hints:
– To disconnect the power supply, unplug the set
from the wall jack.
– Disconnect the power supply to protect your set
during heavy thunderstorms.
POWER-SAVING AUTOMATIC STANDBY
As a power-saving feature, the system automatically
switches to standby 15 minutes after MP3-CD/CD has
reached the end and no control is operated.
The type plate is located on the bottom of
the set.
CONTROL POWER SUPPLY