


Part Number 10400007-101 04/2007 ©2007 Overland Storage, Inc. W Page 2 of 4
Installing the Rack Kit
Every ARCvault 48 comes with a tray-style Rack Kit that
allows you to easily install and remove the unit without
having to engage side rails. The Rack Kit includes all
mounting hardware.
WARNING: It is recommended that a mechanical
lifter (or at least two people) be used to raise and
align the unit to prevent injury during installation.
WARNING: Use care when inserting or removing an
ARCvault unit into or out of a rack to prevent the
accidental tipping of the unit causing damage or
personal injury.
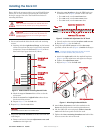
1. Locate and mark the holes for the rails and retaining
screws:
a. Starting with the right front flange, at the bottom
of the rack (or from the top of a previously mounted
component), locate the first set (Figure 2) of three
holes with equal gaps of 5/8 inch (1.6cm).
Figure 2. Holes Used for Attaching Rack Kit Rails
b. Mark the top and bottom holes of the set for the
rail screws.
c. Mark the second and eighth holes above the set
for the retaining screws.
d. Repeat Steps a–c for the left side.
2. Repeat Step 1 for the rear holes.
CAUTION: Be sure rear holes are horizontally in line with the
front holes to assure the unit remains level.
3. Adjust the rail rear brackets to fit the rail inside the
rack flanges:
a. Remove and retain the two adjustment nuts and
washers on the right rail.
b. Move the rear bracket so that the PEM studs are
in different slots (Figure 3) based on the rack size.
• For a 36" rack, use the two front slots.
• For a 30" rack, use the two center slots.
• For a 24" rack, use the two rear slots.
Figure 3. Outside Rail Adjustment for 30” Rack
c. Loosely replace the retained washers and screws.
d. Repeat Steps a–c for the left rail.
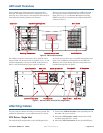
4. Using the eight SEMS screws and four bar nuts
provided, attach the rails (Figure 4) inside the flanges:
NOTE: To ensure proper alignment, the bar nut corner
notches must face outside, away from the rail.
a. Attach the right rail inside the marked locations
(Figure 4) of the right front and right rear flanges.
b. Tighten the adjustment nuts.
c. Repeat Steps a–b for the left rail.
Figure 4. Attaching the Rack Kit Rails
5. Attach four clip-nuts to the holes marked on the
front rack flanges for the retaining thumbscrews.
6. Lift the ARCvault unit and gently slide it into the
rack until the front panel touches the rack.
7. Tighten the four retaining thumbscrews behind the
doors to secure the unit to the rack.
A
R
C
-
0
0
5
9
4U
1/2" (1.3cm)
5/8" (1.6cm)
5/8" (1.6cm)
5/8" (1.6cm)
First
Hole
Set
Retaining Screw
Top Rail
Hole Mark
Bottom Rail
Hole Mark
Hole Mark
Right
Front Flange
Retaining Screw
Hole Mark
A
R
C
-
0
0
6
3
Adjust Rear Bracket to Fit
PEM Studs and Lock Nuts
Front
A
R
C
-
0
0
9
6
Front Flanges
Rear Flanges
Rail Adjustment Nuts
Bar Nut
Clip Nuts